
Measure, cut a wood circle, build a stable base, sand, and finish.
If you want to learn how to make a round table that looks clean, feels solid, and lasts for years, you are in the right place.
I have built many tables for clients and my own home, and I will walk you through each step. This guide blends pro tips, field-tested methods, and clear steps so you can build with confidence.
Project Overview: What You Will Build?
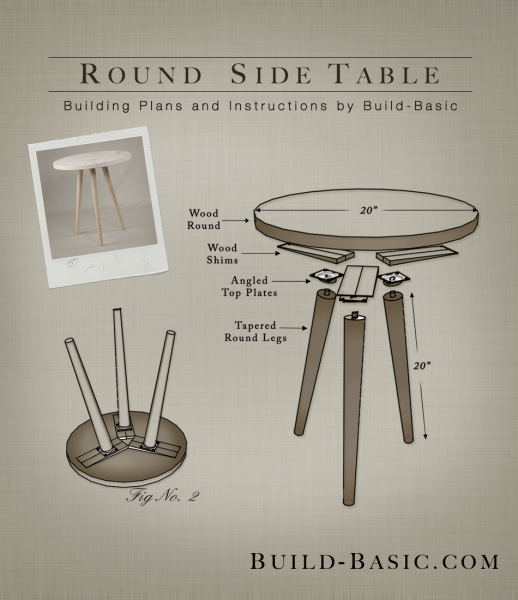
You will build a wood round table with a strong top and a stable base. The design scales for coffee tables, dining tables, or small side tables. You will see options for legs, a pedestal, or a trestle base.
I will show how to make a round table using basic tools. If you have a router or a bandsaw, you can work faster. If not, you still have good options with a jigsaw and patience.
Key specs most homes use:
- Table height: 28 to 30 inches for dining. 16 to 18 inches for coffee.
- Top size: 36 to 60 inches for dining. 16 to 36 inches for side or coffee.
- Legroom: 10 to 12 inches from seat top to table underside.
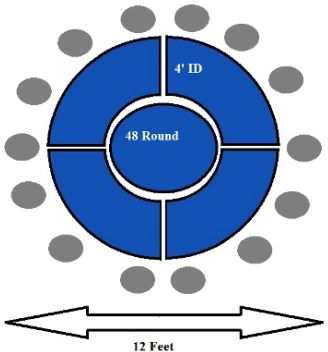
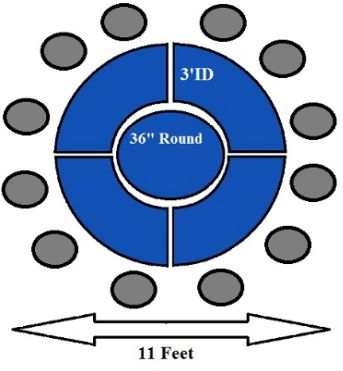
- Seating: 48 inches fits 4. 54 to 60 inches fits 5 to 6.

Tools and Materials Checklist
You can keep the kit simple. Add tools as you like. Here is what I use for how to make a round table that turns out flat and true.
Tools:
- Tape, square, pencil for layout
- Circular saw or table saw for rough cuts
- Jigsaw or router with circle jig for cutting the circle
- Sander with 80, 120, 180 grit
- Drill and driver with countersink
- Clamps, at least 24 to 36 inches
- Optional: planer, jointer, track saw, bandsaw, palm router
Materials:
- Wood for the top: hardwood boards or a plywood core with veneer
- Wood for the base: solid hardwood or sturdy softwood
- Screws, threaded inserts, bolts, washers
- Wood glue, epoxy for knots, wood filler
- Finish: oil, polyurethane, waterborne topcoat, or hardwax oil
- Pads or adjustable levelers for feet
Plan Your Size, Style, and Wood
Decide the use first. A dining table needs more space and more strength than a side table. A coffee table can be lighter.
Pick a top thickness. Common is 1 to 1.25 inches for dining. Coffee tables can be 0.75 to 1 inch. Thicker edges look bold but add weight.
Select wood. Oak, maple, and walnut are stable and take finish well. Pine is budget friendly but dents easy. If you want a light top and a strong core, use cabinet-grade plywood with a hardwood edge band.
For style, choose a clean edge or a soft round. A bevel makes a top look thin and sleek. This is a simple way to make how to make a round table feel modern.
Safety and Workspace Setup
Clear a flat area to assemble and sand. Work off the floor. A couple of sawhorses and a sheet of foam work great.
Wear eye and ear protection. Use a dust mask or respirator when sanding or cutting. Clamp your work. Never hold small parts near a blade or bit.
Keep cords out of your path. Set your tools to the correct depth or speed. Safety first is the best way to enjoy how to make a round table.
Cutting a Perfect Circle: Three Reliable Methods
You have more than one path for how to make a round table top. Pick the method that fits your tools and skill.
Method 1: Router with a Circle Jig
This makes the cleanest edge and a perfect circle.
Steps:
- Mark the center point on your panel. Drill a small pilot hole for the jig pin.
- Set the jig radius to half the desired diameter.
- Make shallow passes at 0.125 inch depth. Rotate slow and steady.
- Repeat until through. Make a final light pass for a clean edge.
Tips from my shop: Blue tape on the base reduces scratches. Spiral bits cut smoother. If the router chatters, slow down.
Method 2: Jigsaw and a Template
Great if you do not have a router.
Steps:
- Make a circle template from thin plywood or MDF using a string and pencil.
- Rough cut the top 0.125 to 0.25 inch outside the line with a jigsaw.
- Clamp the template to the top. Use a flush-trim router bit to copy the template.
- Sand the edge to remove small saw marks.
Method 3: Bandsaw with a Circle Sled
Fast and accurate if you have a bandsaw.
Steps:
- Mount a pivot pin in a scrap sled at the radius mark.
- Spin the work around the pin to cut the circle.
- Clean the edge with a sander or a light router pass.
Glue Up and Flatten the Top
If your top is made from boards, glue them first. Joint the edges or use a straightedge guide. Align grain for a stable, nice look.
Apply glue, clamp with even pressure, and check for flat. Use cauls to keep faces flush. Remove squeeze-out after 15 to 20 minutes with a dull scraper.
When dry, plane or sand the panel flat. Then cut your circle using one of the methods above. This is a key step in how to make a round table that feels smooth and looks pro.
Build a Stable Base: Legs, Pedestal, or Trestle
The base makes or breaks the table. Your goal is strength, balance, and knee room.
Four-Leg Base
- Use 1.75 to 2 inch thick legs for dining tables.
- Tie legs with aprons that are 3 to 4 inches tall.
- Use mortise and tenon joints or dowels or loose tenons.
Pros: Classic look, easy to level. Cons: Less ideal for tight seating around a small round top.
Pedestal Base
- Turned or built-up column with four feet or a round plinth.
- Use half-lap or bridle joints for the feet.
- Add metal levelers under the feet for stability.
Pros: Great knee room. Cons: Needs careful weight balance.
Trestle or X-Base
- Two supports with a stretcher between.
- Join with drawbored tenons or bolts for knockdown.
Pros: Strong and stylish. Cons: Foot traffic can hit the stretcher if too high.
Balance rule: Feet span should be at least 60 percent of the top diameter. For a 48 inch top, aim for feet that reach at least 29 inches across. This helps a lot with how to make a round table that does not tip.
Join the Top to the Base the Right Way
Wood moves across the grain. Let the top expand and shrink a little. Use hardware that can slide.
Good options:
- Figure-eight fasteners: Simple to install and allow movement.
- Z-clips: Fit in a small groove in the apron.
- Slotted brackets: Screws slide in elongated holes.
- Threaded inserts and bolts: Strong, easy to remove the top for moving.
Steps:
- Center the base under the top. Mark hole spots.
- Pre-drill. Use washers. Do not over-tighten.
- Check alignment with a square and tape measure.
I prefer threaded inserts for big tops. They make how to make a round table easy to move without damage.

Edge Profiles, Sanding, and Surface Prep
A round-over edge is safe and smooth. A 0.125 to 0.25 inch round-over feels nice. A chamfer gives a crisp, modern look.
Sand in steps: 80, 120, then 180 grit. Always sand with the grain. Raise the grain with a damp cloth before the last pass. Then sand again with the final grit.
Fill knots and gaps with tinted epoxy if needed. Wipe dust with a tack cloth. This step is vital in how to make a round table with a pro finish.
Choose a Finish for Real Life Use
Pick a finish that fits your space and your time.
Simple and fast:
- Wipe-on oil or oil-wax blends: Warm look, easy repair, lower water resistance.
More durable:
- Waterborne polyurethane: Clear, low odor, fast drying, great for dining.
- Oil-based polyurethane: Tough, amber tone, longer cure time.
- Hardwax oil: Natural look, good feel, periodic refresh needed.
Steps I use for a dining top:
- Seal coat thinned 10 to 20 percent for even soak.
- Light scuff at 220 grit.
- Two to three top coats with light sanding between.
- Let cure per can before heavy use.
A good topcoat is the secret sauce in how to make a round table that survives spills and heat.
Leveling, Stability, and Final Fit
Place the table where it will live. Floors are not always flat. Add pads or adjustable levelers to each foot.
Check wobble. Tighten hardware. If the table rocks, mark the short foot and trim a hair. Then recheck.
Spin the lazy Susan if you added one. Make sure chairs slide under with room to spare. These small checks finish how to make a round table the right way.
Cost, Time, and Sourcing Tips
Cost depends on size, wood, and finish. A 48 inch solid hardwood dining table can range from a few hundred to over a thousand in materials, based on species and hardware.
Timing is about two to four days of work plus cure time. Plan the finish time so you are not rushed.
Smart sourcing:
- Buy S3S or S4S lumber if you lack a planer.
- Use Baltic birch plywood with hardwood edge band for budget tops.
- Reclaim wood for character, but check for nails.
These choices help you decide how to make a round table that fits your budget and schedule.
Common Mistakes and Pro Fixes
- Top not flat: Use more clamps and cauls. Level during glue-up. Flatten with a router sled if needed.
- Wobbly base: Increase foot span. Add levelers. Check joints for racking.
- Finish streaks: Thin the finish. Use a better brush or foam roller. Work in thin coats.
- Visible seams: Joint edges clean. Alternate grain. Use biscuits or dowels only for alignment, not strength.
- Cracks from movement: Use hardware that allows the top to move across the grain.
Learning how to make a round table means learning to spot these early. Fixing small issues now saves time later.
Care and Maintenance
Use coasters and wipe spills fast. Clean with a damp cloth and mild soap. Avoid harsh cleaners.
Renew oil-wax finishes with a fresh coat when dull. Poly finishes need a light scuff and a new coat if they get worn. Pads on chair feet reduce scratches.
These simple steps protect your work and extend the life of your table. This care is part of how to make a round table that stays beautiful.
Frequently Asked Questions of how to make a round table
What is the best wood for a round table?
Hardwoods like oak, maple, and walnut are strong and stable. They resist dents and hold screws well, which helps long term.
How thick should the tabletop be?
Aim for 1 to 1.25 inches for dining and 0.75 to 1 inch for coffee tables. Thicker looks bold but adds weight and cost.
Do I need a router to cut the circle?
No. You can use a jigsaw and a template, or a bandsaw with a jig. A router gives the cleanest edge but is not required.
How do I keep the table from wobbling?
Make the foot span wide enough and add levelers. Check joints, tighten hardware, and adjust the feet to match the floor.
What finish is best for daily use?
Waterborne polyurethane is clear, tough, and quick to dry. Oil-based poly is tougher but adds amber color and needs more cure time.
How big should a round table be for four people?
A 48 inch diameter is a sweet spot for four. You can use 42 inches in a tight space, but serving dishes fit better at 48.
How do I attach the top so it can move?
Use figure-eight fasteners, Z-clips, or slotted brackets. Threaded inserts with slotted holes are also strong and allow movement.
Conclusion
You now know how to make a round table from plan to polish. You learned how to size the top, build a strong base, cut a true circle, and lay down a finish that lasts. With a few tools and a clear plan, this project is within reach.
Pick your size, choose your method, and start with a small mock-up if you like. Share your build, ask questions, and keep learning. If this guide helped, subscribe for more step-by-step builds or leave a comment with your progress.