
Build a flat, sturdy steel bench with a leveled top and strong clamps.
If you want to learn how to make a welding table that stays flat, lasts for years, and fits your shop, you are in the right place. I have built and rebuilt many tables for home shops and small fab teams.
In this guide, I show you what works, where people go wrong, and how to plan, build, and finish a table that makes every weld easier and safer. You will get practical steps, clear choices, and expert tips you can use today.
Materials and tools
Start with a plan and the right steel. Size, thickness, and layout drive the result. A flat, stiff top and a square frame are the core.
Recommended steel for the top:
- 3/8 inch plate for a heavy, stable top. Good for MIG, TIG, and stick.
- 1/2 inch plate for a premium top with very low warp.
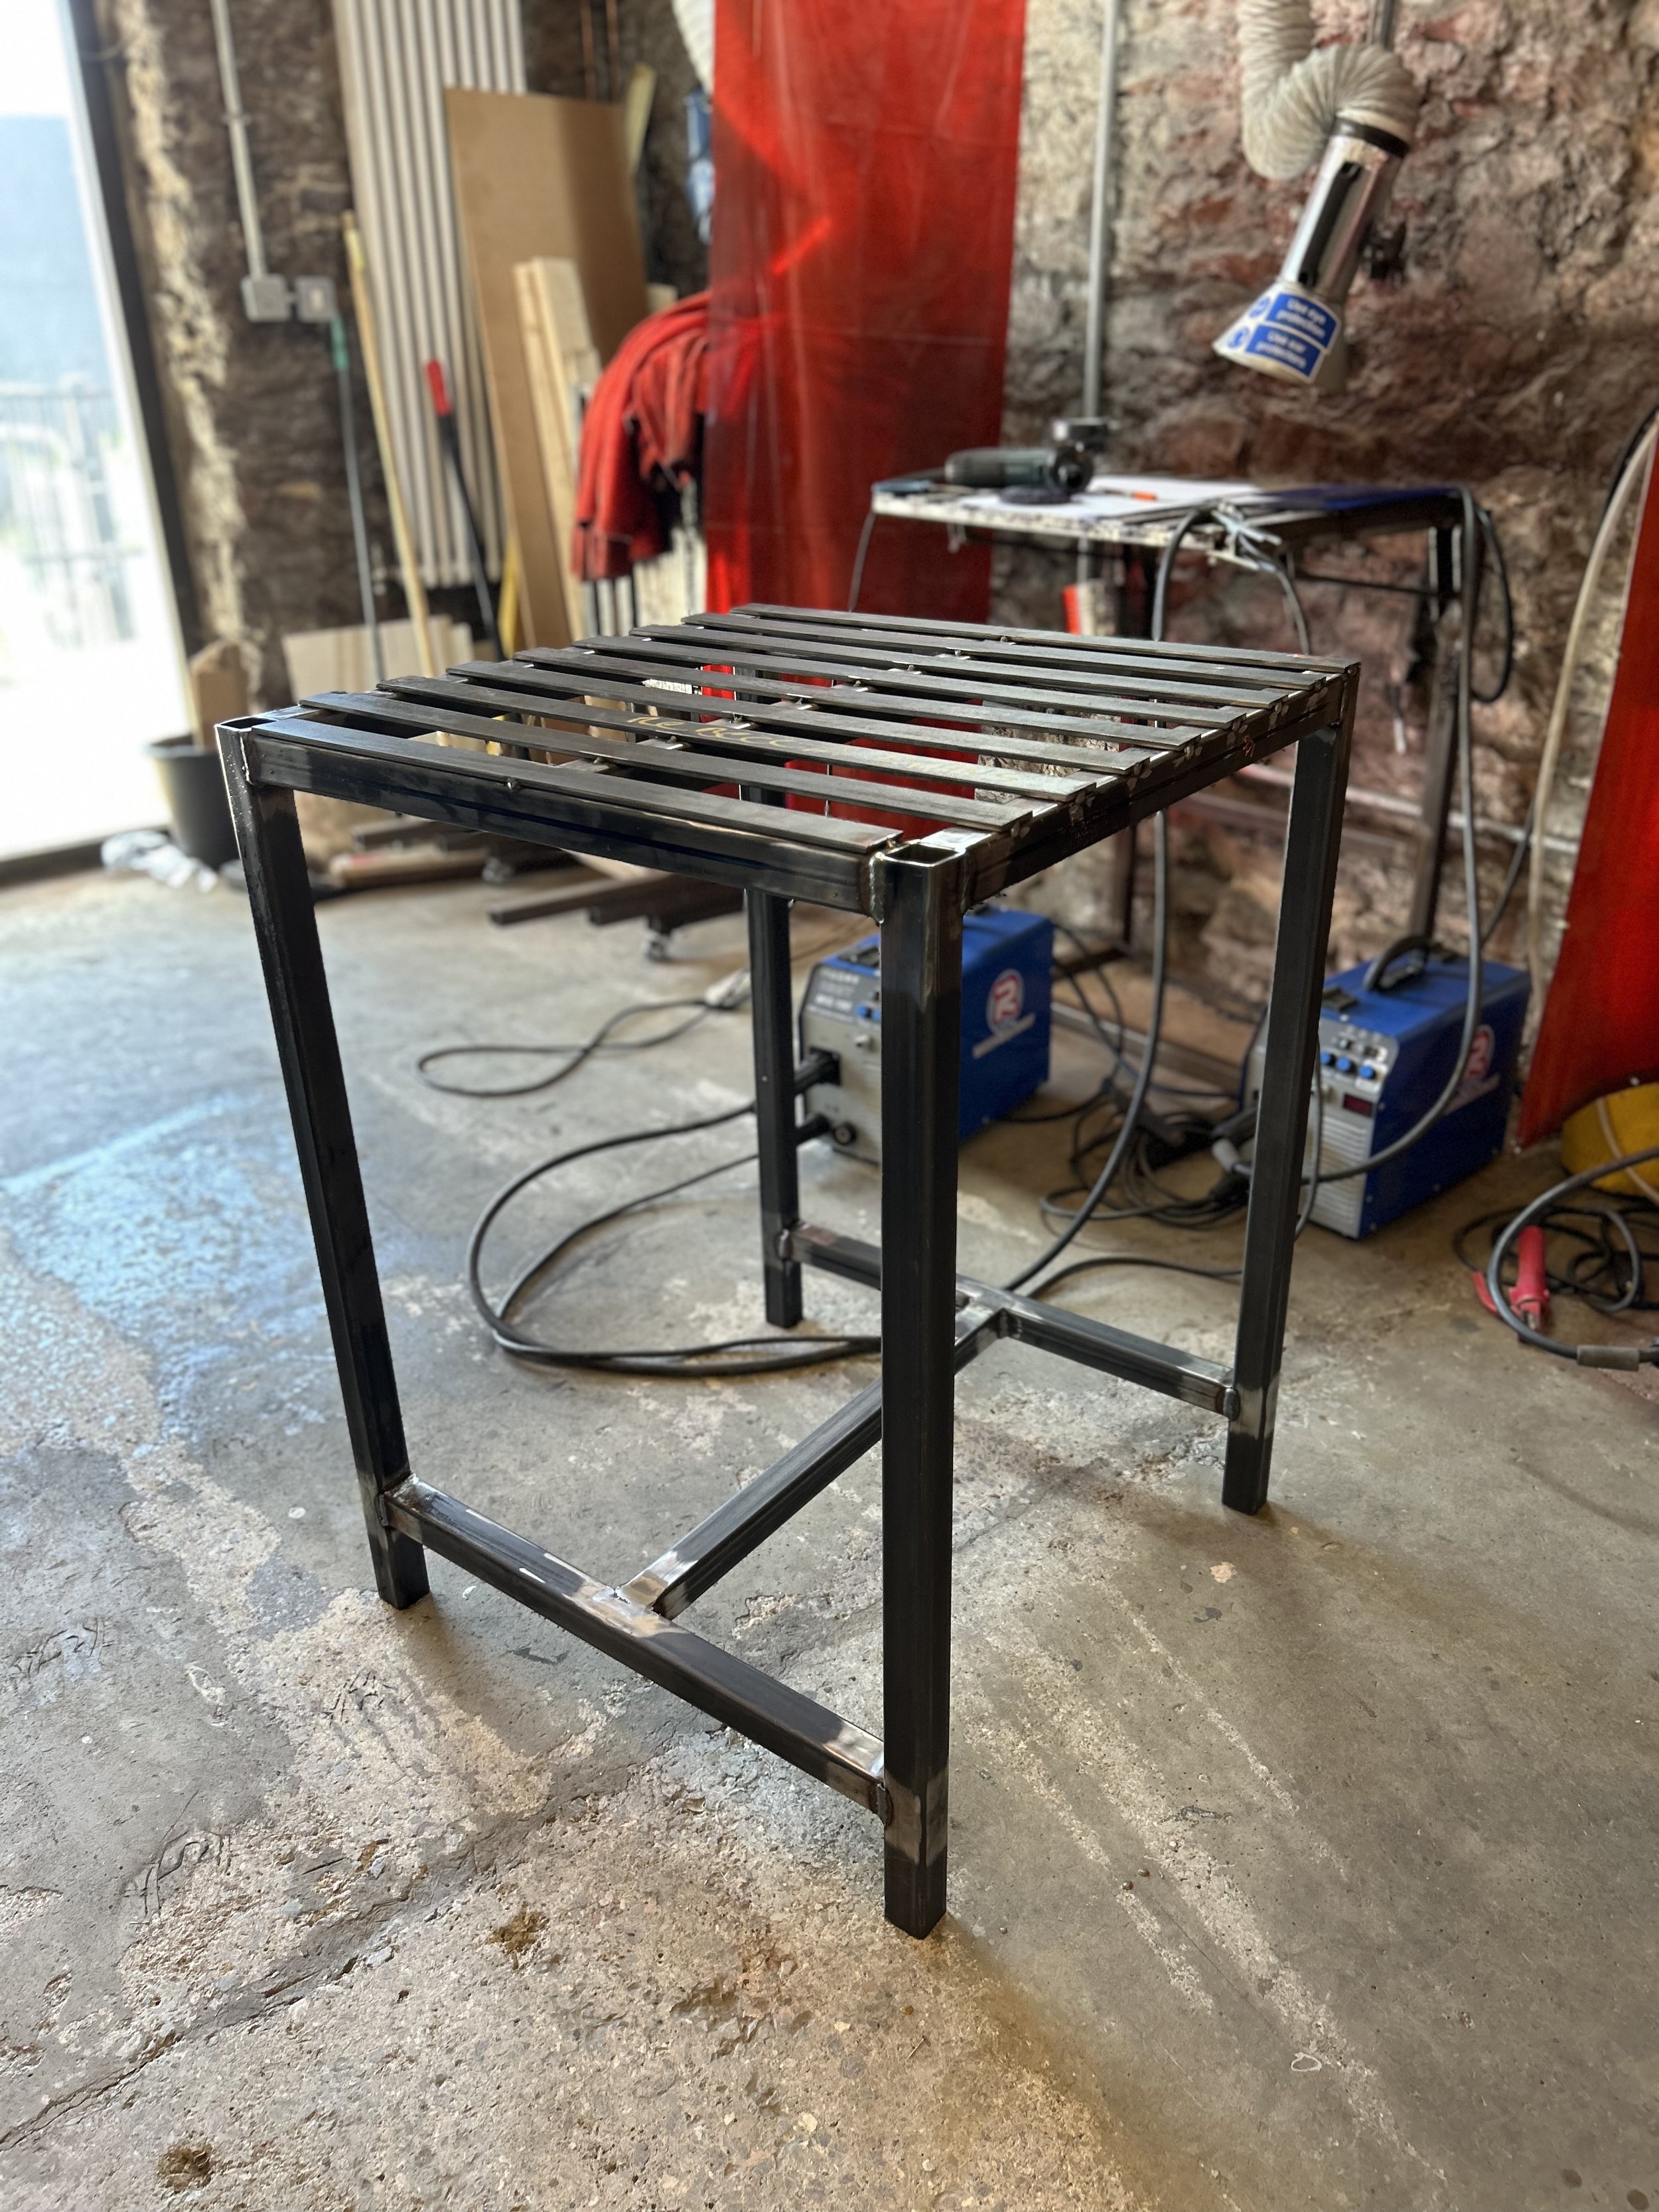
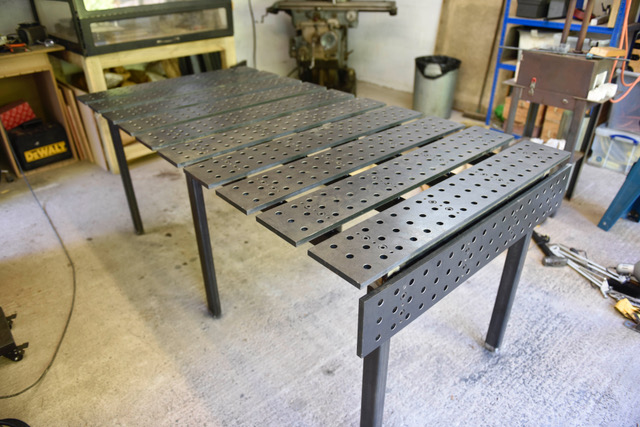
- Budget option: slat top using 2 inch by 1/4 inch flat bars, spaced 1 inch.
Recommended frame:
- 2 inch by 2 inch square tube, 11 gauge or 3/16 inch wall.
- Crossmembers every 12 to 16 inches under the top.
- 3 inch by 3 inch angle for perimeter stiffeners, if using a thin top.
Hardware and extras:
- Four locking casters rated for the full load, or heavy leveling feet.
- A copper or brass ground lug and 4 gauge ground cable.
- Shelf steel or expanded metal for storage.
- Chains and brackets for gas bottle safety.
Tools you will use:
- MIG welder for speed and control. TIG is fine for detail work.
- Angle grinder with flap disc, grinding disc, and wire cup.
- Drill press or mag drill for holes and brackets.
- Accurate square, long straightedge, and tape measure.
- Clamps, magnets, and a digital level.
Why these picks work:
- Thick tops resist heat and warp. Strong frames keep it flat.
- Crossmembers break up spans. This cuts deflection under heat.
- Quality casters and feet keep the table steady and true.

Planning and design
Good design makes the build smooth. It also saves time later when you add jigs and clamps.
Key dimensions:
- Table size: 30 by 60 inches for small shops. 36 by 72 inches for general fab. Pick what fits your space and work.
- Height: 34 to 36 inches for most people. Raise to 38 inches for fine TIG work. Add toe space or overhang so you can stand close.
- Flatness target: Within 1/32 inch over 4 feet, or 1/16 inch over 6 feet.
Top layout options:
- Solid plate top. Simple and tough.
- Grid of 5/8 inch or 16 mm holes on 2 inch or 50 mm centers for fixturing.
- Slotted rails for flexible clamp points.
Build details that pay off:
- Use a stitch weld pattern to control heat.
- Add corner gussets for stiffness.
- Put a ground lug near the working edge.
- Allow cable paths and a power strip at the side.
Standards to keep in mind:
- Follow hot work rules from NFPA 51B.
- Use PPE per OSHA guidance.
- Aim for good fit-up as taught in AWS D1.1 methods.
If you want search-friendly advice on how to make a welding table, start with these choices. Your top, frame, and height are the big three.
Safety and ergonomics
Safe tables help you work longer and better. Build safety into the frame and layout.
Personal protection:
- Wear a proper helmet, jacket, gloves, and boots.
- Use a respirator when grinding and welding in tight spaces.
- Keep a fire extinguisher within reach.
Shop safety:
- Clear a 35 foot hot work area if you can.
- Remove dust, rags, and solvents from under the table.
- Add spark shields if you work near flammables.
Ergonomics:
- Set height so your forearms are near level during tacks.
- Use big handles on clamps to ease hand strain.
- Add a foot rail or toe space to get close to the work.
Stability:
- Use two locking swivel casters and two fixed casters, or four leveling feet.
- Check that locks hold under side load.
- Test wobble before you weld the top solid.

Step-by-step build instructions
You want a clear path for how to make a welding table that ends square and flat. Here is a field-tested plan.
1) Build the base frame
- Cut the four legs to the same length. Deburr ends.
- Cut rails for the long sides and short sides.
- Set parts on a flat surface. Use shims if needed.
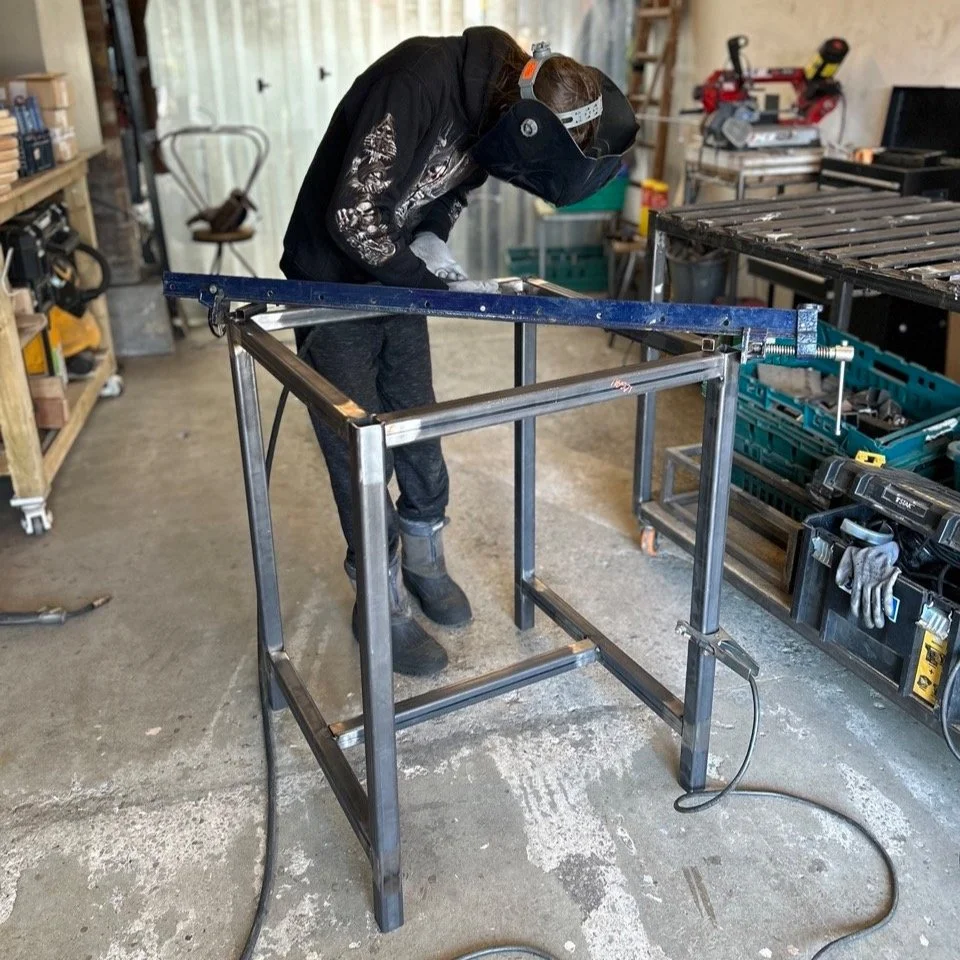
2) Square and tack
- Clamp the long rails to two legs. Tack the corners.
- Add the short rails. Cross-check with a large square.
- Measure diagonals. Adjust clamps until both match.
3) Add crossmembers and shelf rails
- Place crossmembers every 12 to 16 inches.
- Leave room for drawers or a shelf below.
- Tack both ends. Recheck diagonals.
4) Stitch weld the base
- Weld 1 inch stitches, skip 6 inches, then repeat.
- Flip the frame and mirror the pattern.
- Let the steel cool between passes.
5) Fit the top
- Lay the plate or slats on the frame. Support all edges.
- Use thin shims to set the top flat. Check with a long straightedge.
- Clamp every 12 inches to hold the set.
6) Attach the top
- Tack the corners and the center of each side.
- Stitch weld opposite sides to balance heat.
- For slats, weld only at supports to limit warp.
7) Add feet, casters, and gussets
- Weld mounting plates for feet or casters.
- Fit corner gussets to stiffen the legs.
- Add a lower shelf if you like.
8) Ground lug and accessories
- Drill and bolt a copper lug to clean steel.
- Add a power strip bracket on the side.
- Weld tabs for clamp storage.
I use the same sequence on client builds. The base gets square first. The top goes on under clamp and cool welds. This method keeps flatness in check.

Surface prep and flatness
Flatness is the soul of a good table. Small steps make a big change in accuracy.
Prep the steel:
- Grind mill scale on weld zones to bright metal.
- Break sharp edges with a light chamfer.
- Clean with acetone before final welds.
Set and verify flat:
- Use a 48 to 72 inch straightedge and feeler gauges.
- Check both axes and diagonals.
- Use shims at supports to tune the plane.
Control heat:
- Short stitches with cool-down pauses.
- Alternate sides to balance pull.
- Clamp hard at edges and near welds.
Fix minor warp:
- Heat a small spot on the high area and cool with air. Move slow.
- Do not quench with water. It can harden steel and stress it.
- Grind only to blend, not to level large bows.
These steps are vital in how to make a welding table that stays true after hard use.

Clamping, fixturing, and accessories
A good table is also a clamping system. Build it to hold parts fast and repeatable.
Fixturing choices:
- Hole grid with 5/8 inch or 16 mm holes. Works with many clamp kits.
- Slotted rails at 2 inch spacing for quick sliding clamps.
- Removable dogs, stops, and right-angle brackets.
Useful add-ons:
- A 6 inch machinist vise on a corner.
- A pipe-vise insert for tube work.
- Magnetic squares and spring clamps on a side rail.
- A backboard for grinder, discs, and wrenches.
Layout tips:
- Keep a clear main zone for welding.
- Place stops for common projects you repeat.
- Mark a centerline and common angles.
These parts turn a flat top into a fast setup system. They also raise the value of how to make a welding table for real shop work.
Mobility, storage, and power
A clean, mobile table saves time each day. Plan storage and power the right way.
Mobility:
- Choose casters with total load rating above table plus work.
- Locking swivels help, but leveling feet give the best stability.
- If space is tight, add retractable casters.
Storage:
- Add a lower shelf for steel drops.
- Use a small drawer for tips, nozzles, and consumables.
- Keep clamps on side pegs for fast access.
Power and air:
- Mount a metal-cased power strip under the edge.
- Add a cord reel above the table to keep cables off the deck.
- Run air quick connects at the side, not over the top.
Gas bottle safety:
- Use a floor pocket or bracket with two chains.
- Keep bottles outside the leg line to avoid knee strikes.
These touches turn how to make a welding table into how to run a shop station.

Finishing and maintenance
Protect the top, but keep it weld-friendly. Avoid thick coatings that insulate the ground.
Finish ideas:
- Light coat of paste wax or a dry film to slow rust.
- No paint on the top. Paint the frame only.
- Use anti-spatter spray before hot work.
Care routine:
- Scrape spatter at the end of each day.
- Wipe with oil on humid days.
- Dress dings with a flap disc, not a hard wheel.
Ground care:
- Keep the lug bright and tight.
- Clean cable ends and check for heat damage.
A simple care plan keeps the table flat and clean for years. It also supports the core goal of how to make a welding table that performs like a tool, not a shelf.

Cost, time, and budget options
Costs vary by region and steel prices. Plan with a clear bill of materials.
Typical ranges:
- 3/8 inch plate top, 36 by 60 inches: moderate to high cost.
- 1/2 inch plate top: higher cost but top-tier performance.
- Slat top from flat bar: lower cost, more labor.
Ways to save:
- Use clean drops for the frame.
- Choose a smaller top and add extension wings later.
- Start with leveling feet, add casters when needed.
Time plan:
- Day 1: Cut, deburr, and square the base.
- Day 2: Crossmembers, gussets, and feet plates.
- Day 3: Fit and weld the top, finish, and accessories.
When you add it up, how to make a welding table can fit most budgets. Smart design beats raw thickness when money is tight.
Troubleshooting and common mistakes
Even careful builds hit a snag. Here is how to fix the usual problems.
Warped top:
- Cause: Long hot welds in one go.
- Fix: Stitch in short runs, clamp hard, and balance sides.
Out-of-square base:
- Cause: Rushed tacks before checking diagonals.
- Fix: Cut tacks, reclamp, and match diagonals before welding.
Wobbly casters:
- Cause: Mount plates not coplanar.
- Fix: Shim and reweld plates with a straightedge check.
Poor ground:
- Cause: Paint, rust, or dirt at the clamp point.
- Fix: Clean to bright metal and add a copper lug.
Wrong height:
- Cause: Guesswork instead of fit test.
- Fix: Mock height with blocks and test for one hour before welding legs.
These fixes come from many shop builds and are core to how to make a welding table that works on day one.
Frequently Asked Questions of how to make a welding table
What size should my welding table be?
For most home shops, 30 by 60 inches is a great start. If you build gates or frames, 36 by 72 inches gives more reach.
How thick should the top be?
Use 3/8 inch for a solid all-around top. Choose 1/2 inch if you want very low deflection and heavy use.
Do I need holes in the top?
No, but a 5/8 inch hole grid makes clamping fast and repeatable. It also lets you add stops and jigs with ease.
Can I use aluminum for the top?
Steel is best for general welding tables. Aluminum can work for TIG-only setups but scratches and warps more.
How do I keep the table from rusting?
Do not paint the top. Wipe with wax or a light oil and clean after each job. Keep the shop dry and cover the table when not in use.
What welding process is best for building the table?
MIG is fast and strong for the frame and top. TIG is great for detail parts and thin add-ons.
How do I make sure the table stays flat over time?
Use a thick top, stitch welds, and a dense frame. Store heavy items on the shelf, not on one edge of the top.
Is a ground lug necessary?
It is not required, but it improves consistency and safety. A clean lug also reduces arc starts and spatter.
Can I build a welding table with hand tools only?
You can, but a welder, grinder, and drill are key. A mag drill helps a lot for hole grids.
What is the best table height for TIG work?
Many TIG welders like 36 to 38 inches for finer control. Test with blocks until your shoulders and wrists feel relaxed.
Conclusion
You now have a clear plan for how to make a welding table that is flat, strong, and safe. Choose the right top, square the frame, clamp hard, and weld with balance. Add smart fixtures and care for the surface, and your table will pay you back on every project.
Take one step today. Sketch your size, list your steel, and set a build weekend. If this guide helped, subscribe for more shop builds, ask a question, or share your table plan in the comments.