
Cut, dry, sand, seal, and add legs for a long‑lasting stump table.
If you want a durable, beautiful accent piece from raw wood, you’re in the right place. In this guide on how to make tree trunk table, I’ll show you every step I use in the shop, from selecting a safe log to finishing a stable, crack‑resistant surface. You’ll learn pro tips, mistakes to avoid, and easy upgrades that make the table look high‑end and last for years.
Tools and Materials You’ll Need
Before we dive in, gather the right tools and supplies. If you searched how to make tree trunk table, this checklist covers what you need to start and finish strong.
Tools
- Chainsaw or handsaw for rough cuts and trimming
- Drawknife or chisel for bark removal
- Random orbit sander with 80, 120, 150, 180, and 220 grit discs
- Hand plane or router sled for flattening surfaces
- Moisture meter for checking moisture content
- Drill/driver, forstner bits, and countersink bits
- Clamps and straightedge or winding sticks
- Safety gear: gloves, eye protection, hearing protection, dust mask
Materials
- Log or stump (hardwoods like oak, maple, walnut, ash, elm, or cedar)
- Anchor sealer or wax for end‑grain sealing during drying
- Epoxy resin or wood filler for cracks and voids
- Wood glue and optional bowtie keys for stabilization
- Finish: hardwax oil, tung oil, Danish oil, polyurethane, or spar urethane
- Legs or base: hairpin legs, steel frame, wood pedestal, or casters
- Threaded inserts, screws, washers, and adjustable levelers
Choosing the Right Log or Stump
Success starts with the right piece of wood. When people ask how to make tree trunk table without cracks or pests, I always point them to smarter sourcing and inspection.
What to look for
- Species: Dense hardwoods resist dents and wear. Softwoods can work but dent easier.
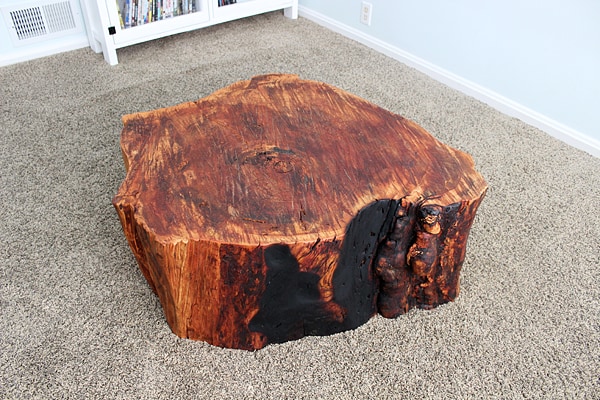
- Size: For a side table, 12–18 inches diameter is ideal. For a coffee table, 20–36 inches looks balanced.
- Condition: Avoid fresh storm‑damaged logs full of spiral checks. Pick straight grain with minimal rot.
- Insects: Check for powdery frass and exit holes. Choose clean stock or plan for treatment.
Pro tip from the shop
- Urban salvage yards and tree services often have stumps they’re glad to offload. Ask for a mid‑trunk section with uniform thickness.
Drying and Moisture Control
Cracks happen when wood dries too fast or unevenly. Understanding moisture is central to how to make tree trunk table that stays stable indoors.
Key steps
- Seal ends immediately: Brush on anchor sealer within hours of cutting to reduce checks.
- Air‑dry slow: Store the log off the ground, out of sun and rain, with airflow on all sides.
- Target moisture: For indoor tables, aim for 8–12% moisture content. Use a moisture meter to confirm.
- Speed options: A professional kiln speeds drying. For stump tables, solar kilns or fan‑assisted sheds help.
What I’ve learned
- Rushing drying causes deep radial cracks. A few controlled checks add character, but patience prevents ruin.
- For bug‑prone logs, borate treatment after debarking helps deter pests during the long dry.
Debarking and Leveling the Surfaces
Clean wood is easier to finish and safer to bring inside. This phase is vital in how to make tree trunk table that looks refined, not rough.
Debarking
- Use a drawknife to peel bark after partial drying. Work with the grain to avoid gouges.
- For stubborn bark, a chisel and mallet lift sections without tearing the cambium layer.
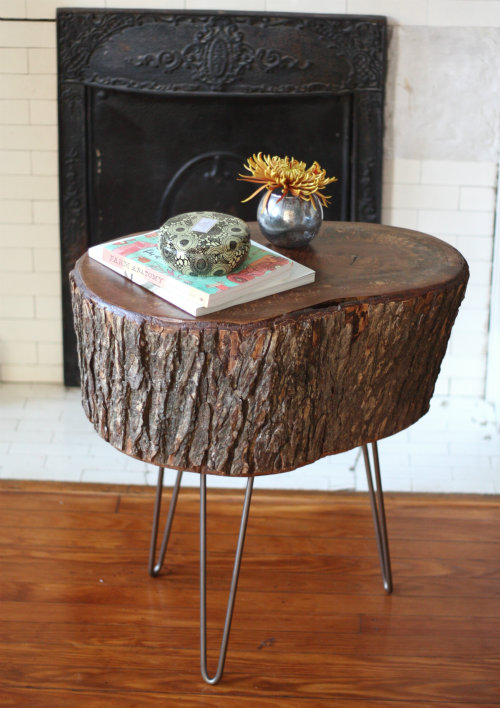
- Optional: Keep a bit of bark for a rustic look if it’s tight and sound.
Leveling top and bottom
- Crosscut both ends flat with a chainsaw or miter saw sled. Use a square to check.
- Flatten with a router sled for precision. A hand plane works if the surface is close.
- Mark high spots with pencil and check with winding sticks to avoid twist.
Sanding, Crack Repair, and Stabilization
This is where the table gains touchable smoothness and long‑term strength. If you want to know how to make tree trunk table that resists splitting, stabilize it now.
Sanding sequence
- Start at 80 grit to remove tool marks.
- Move through 120, 150, 180, and stop at 220 for most finishes.
- Vacuum between grits and wipe with mineral spirits to preview the grain.
Cracks and voids
- Tight cracks: Fill with thin CA glue or tinted epoxy for a seamless look.
- Wide voids: Tape the underside and pour deep‑pour epoxy in layers to prevent heat buildup.
- Structural splits: Add bowtie keys across the crack with wood glue for a beautiful, strong repair.
Hardware prep
- Pre‑drill for threaded inserts now. They hold legs firm and allow easy removal for moving.
Finishing Options for Different Looks
Finish locks in color, resists stains, and makes cleaning easy. Choosing the right finish is central in how to make tree trunk table that fits your space and stands up to use.
Popular finishes
- Hardwax oil: Natural feel, easy repair, silky sheen. Great for high‑touch surfaces.
- Tung or Danish oil: Deep, warm glow that highlights figure. Re‑oil yearly.
- Polyurethane: Strong film build and high protection. Satin poly feels less plastic than gloss.
- Outdoor use: Spar urethane or exterior oil on rot‑resistant species like cedar or white oak.
Pro finishing tips
- Raise the grain with a damp cloth before your final sanding for a smoother feel.
- Seal end grain with a thinned first coat to reduce blotching and uneven absorption.
- Test on an offcut. Wood darkens with oils; know the final tone before you commit.

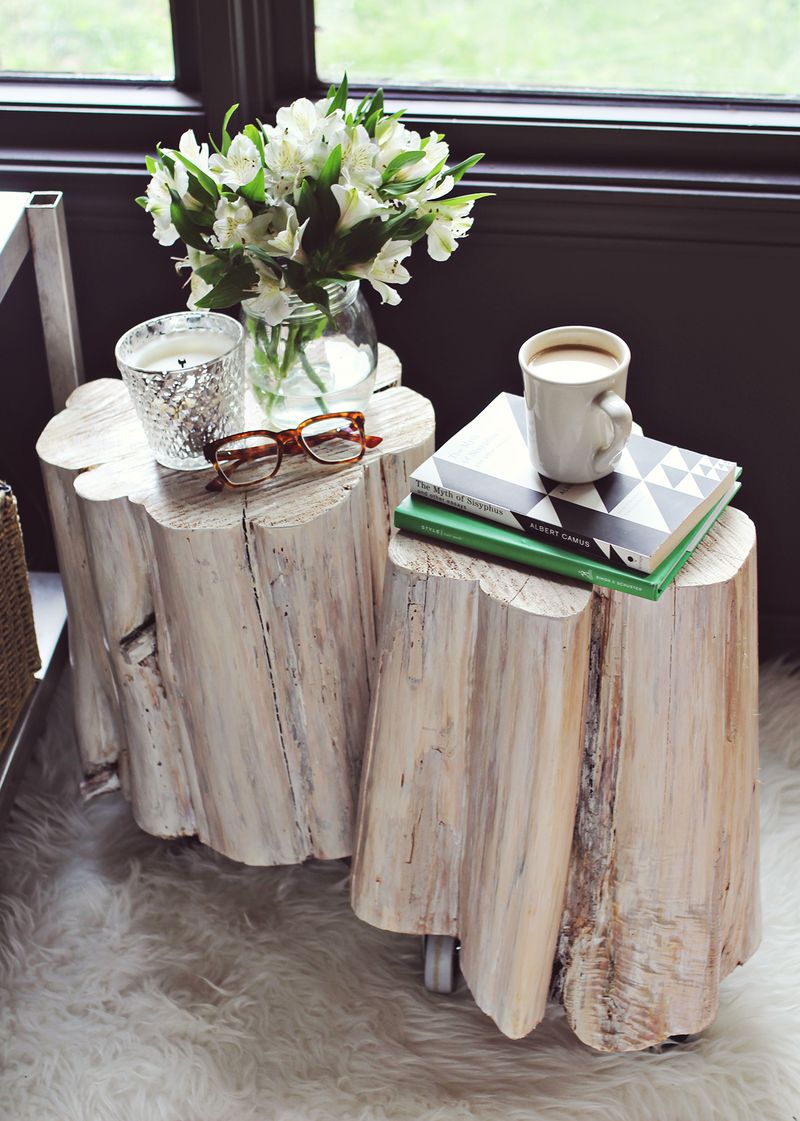
Adding a Base, Legs, or Casters
A stable base prevents wobble and protects floors. This is the point in how to make tree trunk table where function meets style.
Options
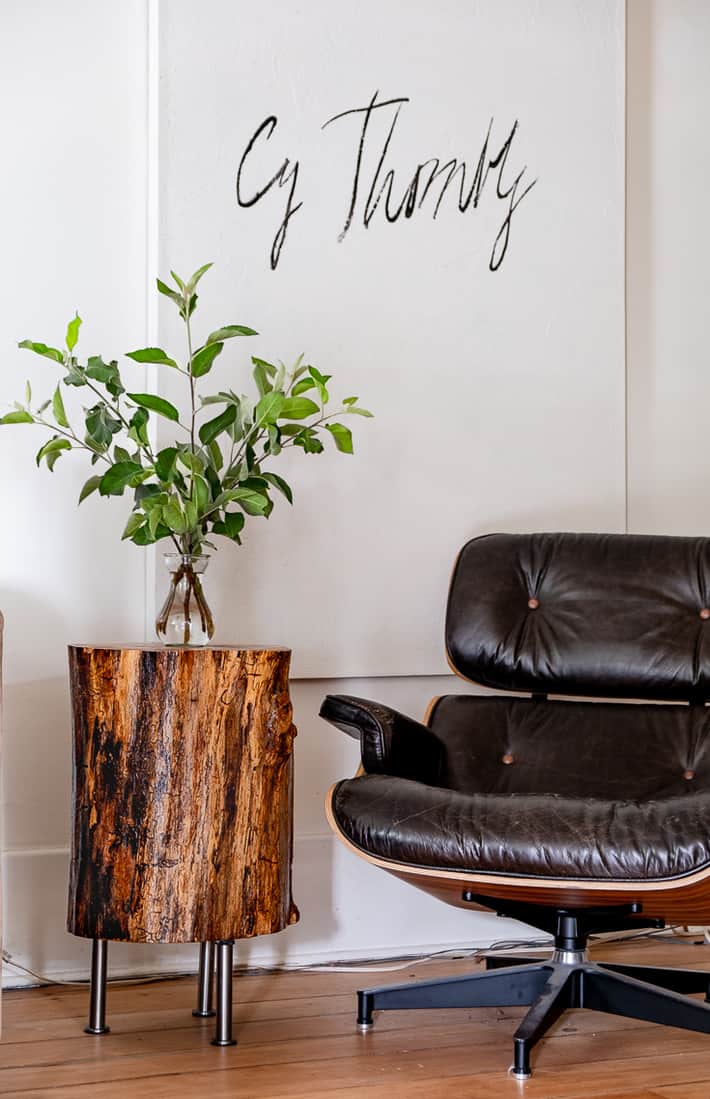
- Hairpin legs: Modern, airy look. Use three for stability on small tops, four on large.
- Steel plate base: Ultra‑stable for heavy slabs; add felt pads or levelers.
- Wood pedestal: Classic and warm; match species or contrast on purpose.
- Casters: Great for movable coffee tables. Use locking casters to prevent drift.
Attachment tips
- Use threaded inserts for repeatable assembly.
- Add rubber or cork feet to minimize noise and protect floors.
- Shim or use adjustable levelers to correct slight out‑of‑flat surfaces.
Step-by-Step: How to Build the Table
Here’s a simple sequence you can follow today. Save it if you plan how to make tree trunk table this weekend.
- Select a seasoned log or start drying a fresh cut with end‑grain sealer.
- Debark and trim both ends square.
- Flatten the top and bottom until they sit stable.
- Sand through grits to 180 or 220.
- Stabilize cracks with bowties or epoxy.
- Install threaded inserts on the underside.
- Apply your chosen finish in thin, even coats.
- Attach legs or base, then add levelers or pads.
- Let finishes cure fully before heavy use.
- Move the table inside and allow it to acclimate for a week.

Safety, Sustainability, and Sourcing
Responsible builds matter. When planning how to make tree trunk table, think safety and ethics as much as style.
Safety basics
- Wear eye, ear, and dust protection when cutting and sanding.
- Work with stable supports; never freehand a heavy log.
- Follow manufacturer guidance when using epoxy and finishes.
Sourcing and sustainability
- Use reclaimed or storm‑fallen wood when possible.
- Avoid protected species and comply with local rules.
- Treat or quarantine logs to avoid bringing pests indoors.
My practice
- I document species, source, and finish. Clients appreciate transparency and it builds trust.
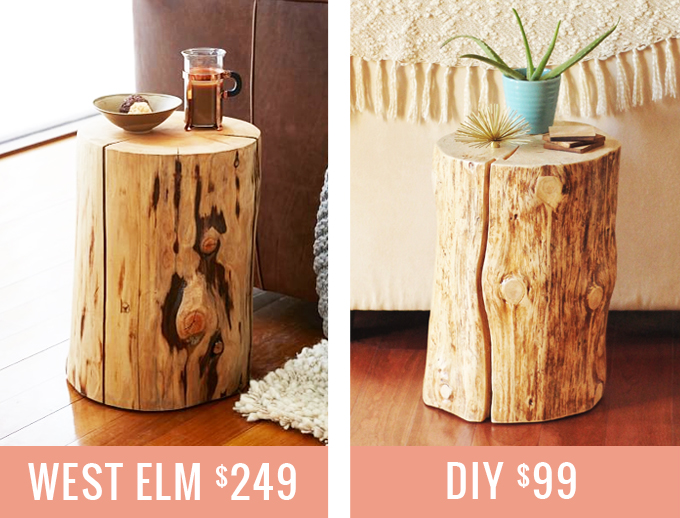
Budget, Time, and Skill Planning
Realistic planning keeps the project fun. If you map how to make tree trunk table across a weekend, allow time for drying and curing.
Typical ranges
- Cost: 80 to 400 dollars depending on legs, finish, and tools you already own.
- Time: 8 to 20 hours of hands‑on work, spread across several days.
- Skill: Beginner to intermediate. The router sled and epoxy pours take practice.
Where to invest
- Spend on moisture control, a stable base, and a quality finish. Those three choices decide longevity.
Maintenance and Long-Term Care
A little care goes a long way. If you want to learn how to make tree trunk table that still looks great in five years, plan for upkeep.
Simple care
- Dust with a soft cloth. Avoid harsh cleaners; use mild soap and water for spills.
- Re‑oil once or twice a year if you used an oil or hardwax finish.
- Keep away from heat vents and direct sun to reduce movement and fading.
Repair notes
- Light scratches sand out at 220 and spot‑refinish.
- If a new crack forms, wick thin CA glue or top up epoxy to stabilize it.
Design Ideas and Pro Tips
Make it yours. Creative touches turn a good build into a statement. These ideas help if you’re exploring how to make tree trunk table with a unique look.
Ideas
- Burn and brush: A light shou sugi ban char adds texture on softwoods.
- Contrast keys: Walnut bowties in maple pop beautifully.
- Glass top: Keep the organic shape but add a smooth, easy‑clean surface.
- Mixed materials: Pair a rustic stump with sleek black steel for modern contrast.
Shop wisdom
- Let the wood lead. Highlight knots and rays rather than fight them.
- Photograph moisture meter readings and stages. It’s proof of quality for clients or for your own records.
Frequently Asked Questions of how to make tree trunk table
How long does a stump need to dry before making a table?
Air drying can take 6 to 18 months, depending on size and climate. Aim for 8–12% moisture for indoor use.
What is the best finish for a tree trunk table?
Hardwax oil gives a natural feel and easy touch‑ups. For maximum protection, use satin polyurethane.
How do I stop my table from cracking more over time?
Dry it slowly, seal ends early, and stabilize major checks with epoxy or bowties. Keep it away from heat vents and direct sun.
Can I keep the bark on?
Yes, if it’s tight and sound. Expect more maintenance and a higher risk of flaking in dry homes.
What legs should I use for a heavy trunk?
Steel hairpin legs or a steel plate base are stable and strong. Use threaded inserts and levelers for secure, adjustable support.
Conclusion
You now have a complete roadmap from raw log to refined furniture. Start with dry, stable wood, flatten with care, and finish for the way you live. Small choices like threaded inserts, levelers, and a smart finish turn a rustic stump into a lasting centerpiece.
Ready to build yours? Gather your tools, follow the steps, and share your progress. Subscribe for more build guides, ask a question in the comments, or explore our next project to keep your skills growing.