
Trace a template on 3/4-inch plywood, cut the shape, add a grippy heel.
A push stick keeps your hands safe and your cuts clean. In this guide, I show how to make a table saw push stick that fits your hand, tracks well, and lasts. You will learn the best size, materials, and steps.
I have built dozens for my own shop, and I will walk you through the process with clear tips, real examples, and safe methods. Read on to master how to make a table saw push stick the right way.
Why a Push Stick Matters for Table Saw Safety
A table saw is a star in the shop, but it can bite. A push stick keeps your fingers away from the blade and the danger zone. It also gives you more control over the cut and the feed rate. Industry safety guidance says to keep hands at least six inches from the blade. That is hard to do without a stick.
I learned this the hard way after a kickback scare on a narrow rip. A simple, solid stick fixed the problem. If you want to work smart, learn how to make a table saw push stick that you will use on every narrow rip and thin stock cut.

Tools and Materials You’ll Need
Gather what you need first. This makes the build smooth and quick.
- Material: 1/2 to 3/4-inch Baltic birch plywood or stable hardwood offcut
- Cutting tools: bandsaw, jigsaw, or scroll saw; handsaw works in a pinch
- Shaping tools: rasp or file, sanding block, 120–220 grit paper
- Drill: 1/4-inch bit for hang hole, countersink for hardware if used
- Marking tools: pencil, square, ruler, French curve or a round object
- Adhesives and grip: spray adhesive, 80-grit sandpaper, rubber sheet, or grip tape
- Optional hardware: small screw for a replaceable heel, rare-earth magnet for storage
- Finish: wipe-on poly or shellac to seal and protect
Before you begin, set up dust collection and wear eye, ear, and lung protection. These basics set you up for success as you learn how to make a table saw push stick that is safe and strong.

Choose the Right Design
There are three common designs. Each has a place in the shop.
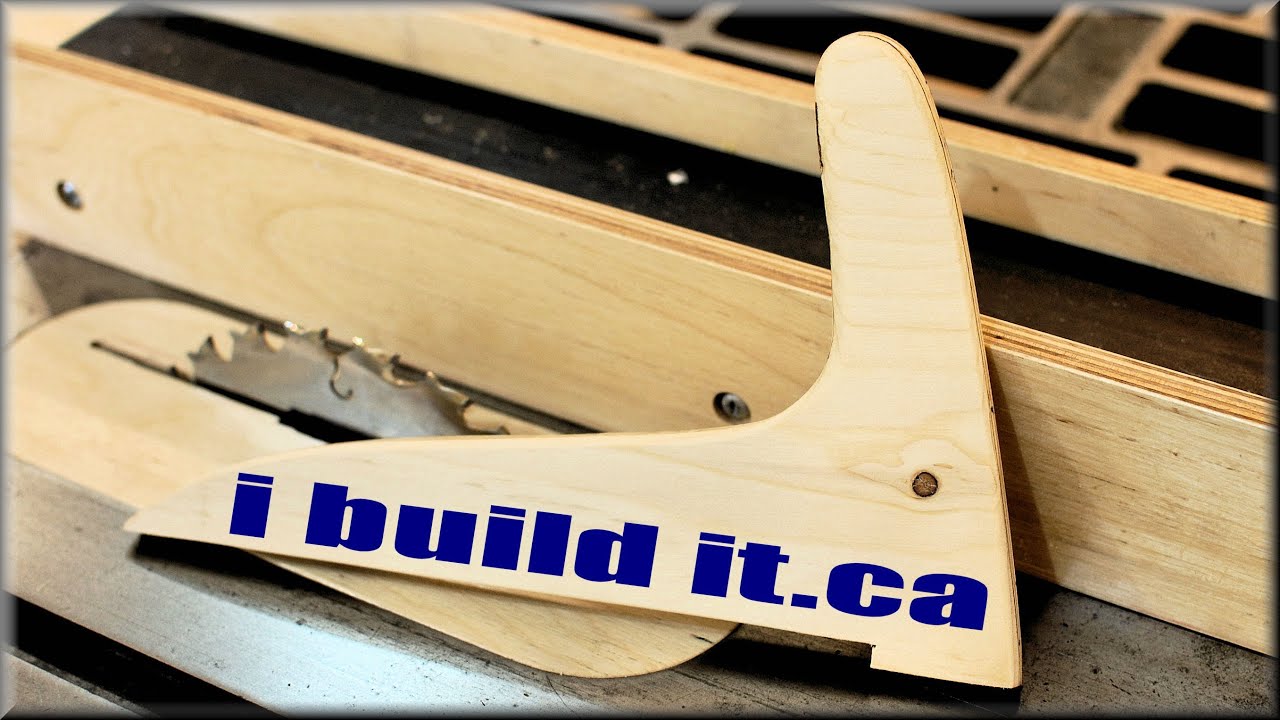
- Long notched stick: Great for narrow rips. The rear notch hooks the work. It keeps your hand high and safe.
- Paddle or shoe style: A wider base that rides the work and fence. Best for thin stock and sheet goods.
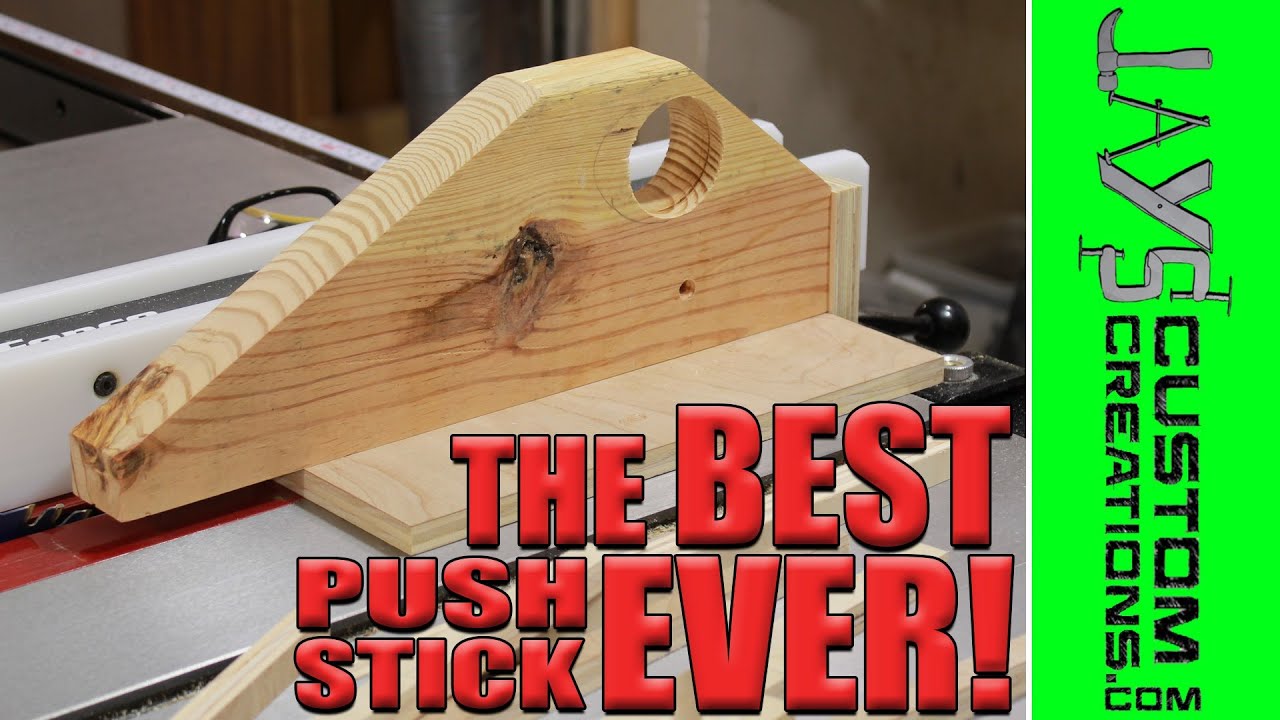
- Push block with heel: A tall handle with a flat sole and a small replaceable heel. It shines for jointing and short parts.
If you want one tool to start, build a long notched stick. It is the best first step when learning how to make a table saw push stick for most rip cuts. Later, add a paddle or block for thin sheet and very narrow parts.
Dimensions and Ergonomics That Work
Size matters. It affects safety, comfort, and control.
- Length: 12 to 16 inches. Longer gives more reach and keeps hands clear.
- Thickness: 1/2 to 3/4 inch. Thick enough to resist flex and vibration.
- Heel notch: 1/4 to 3/8 inch deep. This grabs stock without crushing it.
- Handle height: 4 to 5 inches from the base. It clears the fence and guard.
- Handle angle: 20 to 30 degrees forward. This pushes down and forward at once.
Round over every edge your hand touches. A smooth stick reduces fatigue. These small details set apart a good build from a great one when you plan how to make a table saw push stick for daily use.

Step-by-Step: How to Make a Table Saw Push Stick
Here is a clear path from blank to shop-ready stick.
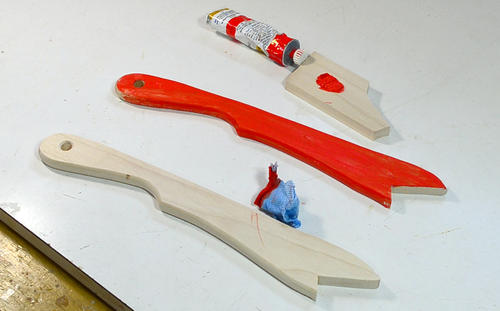
- Make or print a template. You can sketch a gentle S-curve for the grip and a long nose. Keep the heel notch square to the base.
- Trace the template onto 3/4-inch plywood or hardwood. Avoid knots or voids.
- Rough cut the shape with a bandsaw or jigsaw. Stay just outside your line.
- Cut the heel notch. Keep the base dead straight for clean tracking on the table.
- Refine the shape with a rasp and sanding block. Sneak up to the line.
- Round over grip edges. Use a file or a 1/8-inch round-over bit at a router table.
- Flatten the base. Lap it on 120-grit sandpaper on your saw top or a flat plate.
- Add a grip surface to the base or heel. Use 80-grit sandpaper, cork, or rubber.
- Optional: Add a replaceable heel. A small screwed-on MDF tab works well.
- Drill a hang hole near the handle. This keeps the tool handy and off the table.
- Seal with a light finish. One thin coat of wipe-on poly reduces humidity swell.
- Test on scrap. Check push, heel bite, and clearance across the blade and fence.
As you practice how to make a table saw push stick, you will find small tweaks that fit your hand. Save your template so you can make a fresh one in minutes.
Finishing Touches and Useful Add-ons
Small upgrades boost safety and comfort.
- Grip tape on the handle improves hold with dusty hands.
- A bright color stripe makes the stick easy to spot in a busy shop.
- A rare-earth magnet lets you park the stick on the saw’s steel frame.
- A replaceable heel saves the stick when the notch gets chewed up.
- A fence guide lip keeps the stick aligned on thin rips.
These simple adds pay off every time. They are fast to install and help when you teach others how to make a table saw push stick they will reach for often.

How to Use a Push Stick the Right Way?
Method matters as much as design. Use these habits on every cut.
- Set the fence and blade height first. The blade should rise just above the work.
- Stand balanced, a bit left of the blade. Keep your line of push straight.
- Push down and forward, not sideways. Let the fence guide the stock.
- Use a second stick for very narrow rips. One controls feed; one controls hold-down.
- Add a featherboard to keep stock tight to the fence ahead of the blade.
If you teach a new woodworker how to make a table saw push stick, also teach these moves. Good sticks and good habits go together.
Care, Maintenance, and When to Replace
A push stick is a consumable. Treat it like a sharp pencil.
- Inspect the heel. Replace it if it chips or rounds over.
- Check the base. If it is not flat, lap it. If it is warped, make a new one.
- Clean grip tape or replace worn rubber. You need good traction.
- Retire a stick after a deep saw mark near the handle.
Plan to make a batch. Once you know how to make a table saw push stick, it takes less than 30 minutes to build a fresh one from your saved template.
.jpg)
Common Mistakes to Avoid
Avoid these traps that I see in many shops.
- A thin, flimsy stick that flexes near the blade. Use thicker stock.
- A heel that is too deep. It can crush end grain and cause a wobble.
- Pushing only forward. Always add downward pressure to keep stock flat.
- Standing in line with the blade. Move left and keep your body safe.
- Letting the stick ride the blade. Keep the base flat on the table and against the fence.
These fixes are fast. They raise your success rate as you learn how to make a table saw push stick you can trust.
Templates, Jigs, and Alternatives
You have many paths to a good result.
- Make a cardboard template first. Tune the grip before you cut wood.
- Print a PDF pattern at 100% scale. Spray glue it to the blank and cut on the line.
- Use a router and flush-trim bit with a hard template for repeat builds.
- CNC or 3D print a push block if you have the gear. Keep the heel replaceable.
- Buy a ready-made stick as a backup. Still, it pays to know how to make a table saw push stick that fits your hand.
Keep a spare template in your hardware drawer. Future you will be glad you did.
Frequently Asked Questions of how to make a table saw push stick
What wood is best for a push stick?
Use Baltic birch plywood or hard maple. Both stay flat and resist chipping.
How long should a push stick be?
Aim for 12 to 16 inches. That length keeps your hand well away from the blade while giving good control.
Do I need a replaceable heel?
It helps, but it is not required. A small screwed-on heel saves the main body and is easy to swap.
Can I use plastic or HDPE instead of wood?
Yes, many makers use HDPE or UHMW. They slide well, but make sure the heel grips the work.
When should I replace my push stick?
Replace it when the heel is worn, the base is not flat, or the stick has deep cuts near the handle. Fresh tools build safer habits.
Is one push stick enough?
Keep at least two. For narrow rips, one pushes forward and one holds down near the fence.
Can I copy this design for a left-tilt and right-tilt saw?
Yes. Just check blade clearance on your saw and tweak the nose if needed. Always test on scrap.
Conclusion
A good push stick is a small project with a big payoff. You now know how to make a table saw push stick that fits your hand, tracks straight, and keeps your fingers safe. Pick your design, trace a template, and build two today.
Put these tips to work on your next rip cut. Share your build, ask questions, or subscribe for more shop-proven guides that help you work safer and better.