
Build a simple console table with basic tools, affordable lumber, and clean joinery.
If you want to know how to make a console table that looks refined, lasts for years, and fits your space, you are in the right place.
I have built dozens for entryways, living rooms, and offices. This guide will walk you through planning, tools, joinery, and finishing with clear steps and pro tips so you can craft a piece you are proud to display.

Planning Your Console Table: Size, Style, and Budget
A good build starts with a clear plan. Measure your space, sketch your idea, and set a budget. When learning how to make a console table, your plan guides every cut.
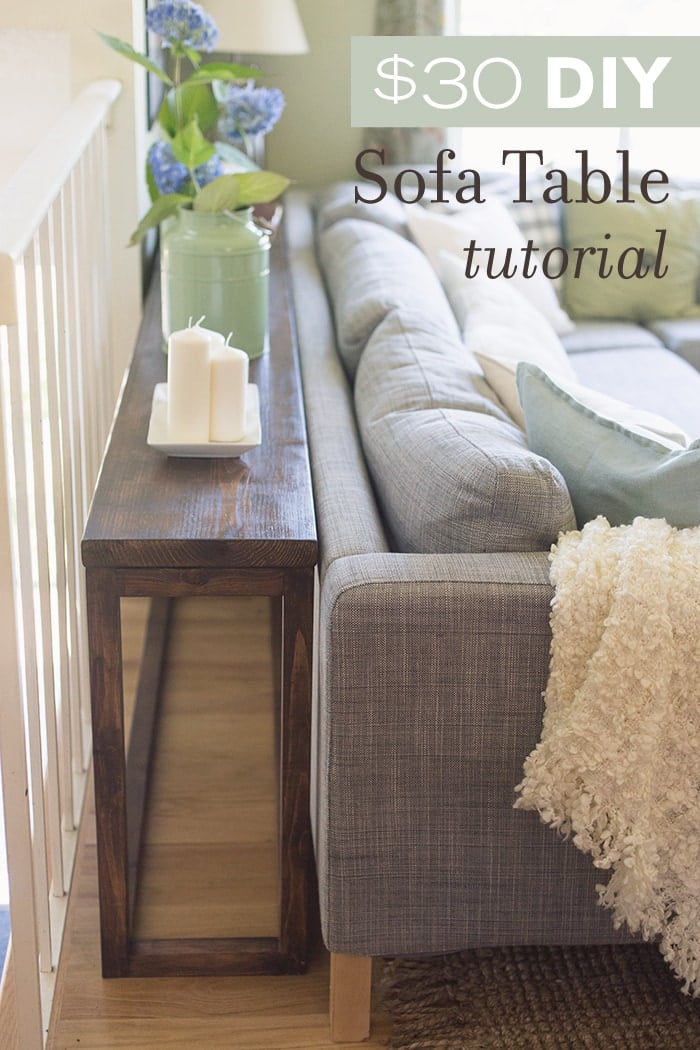
Common sizes work well. A height of 30 to 32 inches fits most spaces. Depth can be 10 to 14 inches for narrow halls. Length can be 36 to 60 inches, depending on your wall.
Pick a style that matches your home. Clean modern lines are simple to build. Rustic styles hide small flaws and look warm. Traditional designs may need more detail work.
Use these planning tips:
- Match height to nearby furniture so the top lines feel smooth.
- Keep depth slim in tight halls to avoid bumps.
- Choose wood that suits your finish plan and budget.
I learned this the hard way. I once made a console table too deep for a walkway. It looked great but felt in the way. A small change in depth fixed the flow and the look.

Tools and Materials Checklist
Good tools make the work safer and faster. Before you start how to make a console table, gather what you need.
Core tools:
- Tape measure, square, pencil, and level
- Circular saw or miter saw
- Drill and driver bits
- Pocket hole jig or dowel jig
- Clamps, at least four
- Orbital sander and sandpaper (120, 150, 180, 220 grits)
Materials:
- Lumber: poplar or pine for paint, oak or maple for stain
- 1x or 2x boards for top and aprons
- 2×2 or 3×2 for legs
- Wood glue and screws (pocket hole or standard)
- Wood filler, stain or paint, and clear coat
Safety:
- Safety glasses, hearing protection, dust mask or respirator
- Drop cloths and rags
When I teach how to make a console table to beginners, I suggest simple pocket hole joinery. It is strong for this use and keeps costs low.

Step-by-Step: How to Make a Console Table
Follow this simple process. It shows how to make a console table with clean lines and solid joints.
- Mill and prep lumber. Check for twist or bow. Cut ends square.
- Cut the legs. Aim for four legs at 30 to 32 inches long. Keep them the same length.
- Cut the aprons. Front and back aprons span the length. Side aprons set the depth.
- Dry fit the frame. Stand the legs and clamp aprons to check size and square.
- Mark joinery. Use pocket holes or dowels on the apron ends. Keep holes on the inside.
- Drill and glue. Apply wood glue to joints. Clamp and drive screws or insert dowels.
- Check square. Measure corner to corner on the frame. Adjust clamps until equal.
- Add a lower stretcher or shelf if you want. It boosts stiffness and storage.
- Make the top. Edge glue boards to your final width. Clamp with even pressure.
- Flatten and sand the top. Start at 120 grit and work up to 180 or 220.
- Attach the top. Use figure-eight fasteners or slots in the apron to allow wood movement.
- Final sand and finish. Ease edges with light sanding for a soft, touchable feel.
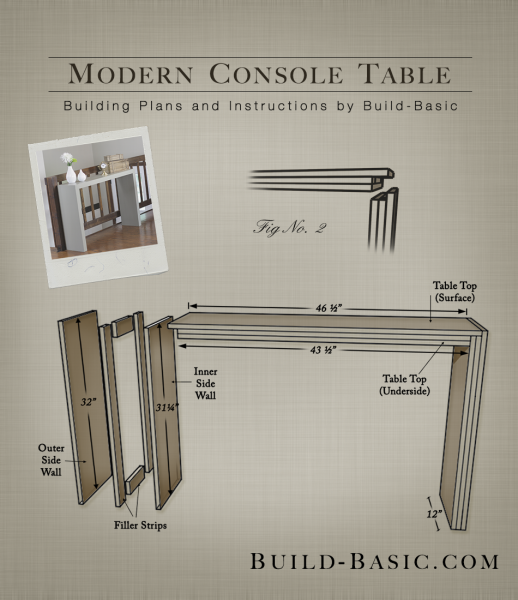
A classic size example:
- Top: 12 by 48 inches
- Legs: 1.5 by 1.5 inches by 31 inches
- Aprons: 3.5 inches tall with a 0.5 inch setback from the leg face
This simple plan shows how to make a console table that balances strength and a light look. It also takes paint or stain well.
Joinery Options Explained
Joinery affects strength, cost, and time. When thinking through how to make a console table, pick the method that suits your tools.
Pocket holes:
- Fast and simple
- Hidden under the top and inside aprons
- Great for beginners
Dowels:
- Clean and strong for aprons to legs
- Needs careful alignment
- Good for painted or stained builds
Domino or loose tenons:
- Pro-level accuracy
- Very fast if you have the tool
- High cost
Mortise and tenon:
- Classic and strong
- More time and skill
- Ideal for heirloom pieces
Metal brackets:
- Quick and adjustable
- Visible in some designs
- Best in modern or industrial styles
I use pocket holes for fast builds and dowels for stain-grade work. Both hold up well in daily use.

Finishing: Sanding, Stain, Paint, and Protection
A fine finish makes the piece shine. Sand well. Dust off between grits. Do not skip grits.
For stain:
- Pre-condition softwoods to reduce blotch
- Wipe on stain and remove excess with a clean rag
- Seal with water-based poly for a clear look
For paint:
- Fill holes and sand smooth
- Use primer for better coverage
- Apply two coats of enamel or cabinet-grade paint
Topcoats:
- Water-based poly dries fast and stays clear
- Oil-based poly adds warmth but may amber
- Hardwax oils feel warm and are easy to spot repair
Read the product’s data sheet for dry times and cure windows. Patience here pays off for years.

Safety and Workspace Tips
Safety is part of how to make a console table the right way. Clear your bench and plan each cut. Work with good light and steady footing.
Key tips:
- Wear eye, ear, and dust protection
- Clamp your work before drilling or cutting
- Support long boards to avoid kickback or binding
Ventilate when finishing. Use a respirator rated for organic vapors if needed. Follow all product safety data and store oily rags in a metal can.

Troubleshooting and Pro Tips
Even experts fix small issues. These tips come from builds that taught me a lot.
Common problems and fixes:
- Gaps at joints: Add clamp pressure and use cauls. A bit of filler hides tiny gaps.
- Wobbly frame: Check square and add a back stretcher. Tighten screws.
- Top cup or bow: Clamp across the curve. Let it acclimate, then sand flat.
Pro tips:
- Mark front faces and keep grain flowing for a calm look.
- Break sharp edges. It feels better and resists dents.
- Test stain on offcuts from the same board.
Use these to improve how to make a console table that looks pro level.
Cost and Time Breakdown
Budget helps set choices. Costs vary by region and wood.
Typical ranges:
- Lumber: 40 to 120 for pine or poplar, 100 to 250 for oak or maple
- Hardware and finish: 25 to 80
- Tools you may need to buy: 50 to 200 for a jig and bits
Time plan:
- Planning and shopping: 1 to 2 hours
- Cutting and joinery: 2 to 4 hours
- Glue-up and sanding: 2 to 3 hours
- Finish: 1 to 2 hours of work, plus cure time
If you are new to how to make a console table, add buffer time. Enjoy the process, not just the result.
Eco-Friendly and Advanced Upgrades
You can build green and add high-end touches. It takes small changes in choices.
Sustainable steps:
- Use FSC-certified wood or reclaimed lumber
- Choose low-VOC finishes and glues
- Reuse offcuts for stretchers or shelves
Upgrades:
- Hidden drawers with soft-close slides
- Brass or black metal accents on legs
- Waterfall edges with a mitered top
- Inset power grommet for charging
These upgrades can turn how to make a console table into a custom design project.
Frequently Asked Questions of how to make a console table
What wood species is best for beginners?
Pine and poplar are easy to cut and budget friendly. They paint well and sand fast, which keeps the learning curve smooth.
How do I keep the table from wobbling?
Make sure the frame is square and add a back stretcher. Use levelers on the feet if your floor is uneven.
Can I build a console table without a miter saw?
Yes. A circular saw with a guide track works fine. Use a square to mark clean lines and cut slowly.
How do I attach the top to allow wood movement?
Use figure-eight fasteners or elongated screw slots. This lets the top expand and contract without cracking.
What finish lasts best for high-traffic areas?
Water-based polyurethane is tough and clear. It resists scuffs and is easy to clean in entryways and living rooms.
How long does a beginner build usually take?
Plan a weekend. Day one for cuts and assembly, day two for sanding and finish.
Is pocket hole joinery strong enough for a console table?
Yes, for this use it is strong, especially with glue. Keep screws inside the aprons and add a stretcher for more rigidity.
Conclusion
You now know how to make a console table from plan to polish. Measure your space, choose a simple joinery method, and finish with care. The steps are clear, the tools are basic, and the results can look high-end.
Start with a small, slim build and learn by doing. Then take on bolder designs with drawers or shelves. Share your project, ask questions, and subscribe for more build guides and tool tips.