
Top picks include expanding foams, plant-based sprays, and bird-safe sticky traps.
You hear the low drone under the eaves, then see fresh sawdust on the deck rail. Carpenter bees are back. I know the worry: tunnels in trim, pockmarked posts, and that protective male hovering at your face.
The right solution saves your wood and your patience. In this guide, I break down the best carpenter bee killers I have tested and recommended over years of home and field use. I keep it simple. I focus on what works fast, what lasts, and what keeps pets and birds safe. Let’s fix the problem for good.
4 Best Carpenter Bee Killers
BioAdvanced Carpenter Bee Foam, 18 oz
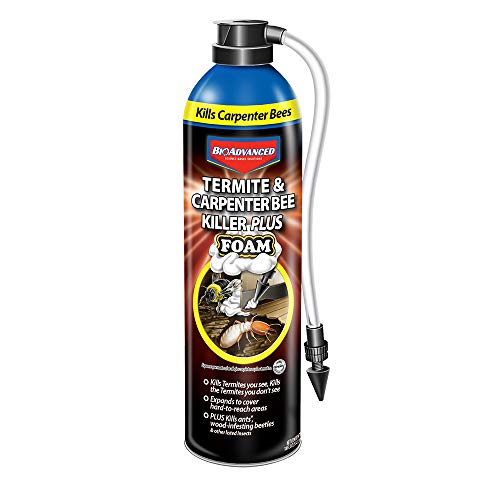
This expanding foam is built for tight galleries. I like it for deep, hidden holes under trim and fascia. The can delivers a fine foam that swells into the tunnel and coats the inner walls. That means you reach eggs, larvae, and adults in one shot. It is one of the best carpenter bee killers when you want fast coverage with little mess.
Use it in the evening when activity slows. Aim the straw tip into the entry hole and fill until resistance. I let it cure and avoid plugging the hole for a few days. That helps returning bees contact the residue and share it deeper in the tunnel. Then I repair and seal late in the season.
Pros:
- Expanding foam fills long, twisting galleries
- Straw applicator reaches high eaves and soffits
- Fast knockdown with lasting tunnel coverage
- Less drip and run-off than liquid sprays
- Great for patch-and-paint follow-up work
Cons:
- Best for obvious, accessible entry holes only
- Not ideal for broad, open surfaces
- May require repeat if the gallery branches
My Recommendation
If you can see the holes, this foam is a smart first-line tool. It packs reach, control, and tidy work in one can. I suggest it for deck beams, pergolas, and trim where carpenter bees return to the same hole. Among the best carpenter bee killers, it shines when you need targeted control without overspray.
| Best for | Why |
|---|---|
| Active holes in trim and joists | Foam expands to touch larvae and adults deep inside |
| High, tight spots | Straw tip directs foam without climbing too far |
| Pre-paint repairs | Low mess foam makes patching and sealing simple |
Donaldson Farms Natural Foaming Bee Spray, 16 oz

This natural foam spray leans on plant-based actives and strong scent. I like it when I want quick control with a cleaner label profile. The foaming body helps it cling at the entry and move down the tunnel. It is gentle on surfaces and easy to use at dusk when bees settle.
Natural does not mean weak, but it does mean you need smart timing. I spray when the weather is dry and mild. I recheck holes the next day and treat again if I still see frass. As part of a plan, it is one of the best carpenter bee killers if you prefer botanical formulas.
Pros:
- Plant-based formula with a foaming action
- Clings to wood and holds in galleries
- Lower odor after dry-down than many synthetics
- Good choice near patios and play areas
- Easy to apply in short bursts
Cons:
- May need repeat treatments on large nests
- Strong scent on application
- Shorter residual than some synthetic foams
My Recommendation
I recommend this for homeowners who prefer natural, plant-based options. It suits light to moderate activity where you can reach the entry holes. The foam body gives an edge over thin sprays. For many families, it ranks among the best carpenter bee killers because it balances safety and speed.
| Best for | Why |
|---|---|
| Eco-minded users | Botanical actives with foam for tunnel cling |
| Decks and porches | Low mess application around living spaces |
| Light infestations | Fast knockdown with simple re-treatment as needed |
RESCUE! TrapStik for Carpenter Bees, 2 Pack

This sticky trap uses visual patterns to attract carpenter bees and similar wasps. It is a non-toxic option that works for monitoring and control. I hang it near problem zones but away from flowers and bird paths. Used right, it cuts down males hovering and reduces new boring.
Recent designs include guards and placement guidance to protect birds. I always hang traps under eaves or rooflines, not in open bird traffic. The glue holds up well in dry weather and catches fast. For many users, this is one of the best carpenter bee killers when you want set-and-forget support.
Pros:
- Non-toxic sticky capture with visual lure
- Good for continuous monitoring
- Helpful near known nesting sites
- Reduces male hovering pressure
- Works alongside foams and sprays
Cons:
- Can catch non-target insects
- Placement is key to avoid bird contact
- Glue can load up fast in heavy activity
My Recommendation
I like TrapStik as part of an integrated plan. It keeps pressure down while foam or spray handles the nests. If you hang it with care, it is one of the best carpenter bee killers for ongoing defense. Use it early in spring and through the season.
| Best for | Why |
|---|---|
| Monitoring hot spots | Lets you see pressure and trends over time |
| Reducing hover males | Visual lure cuts nuisance near doors and decks |
| Add-on to treatments | Non-toxic support with foam or spray use |
Wood Wasp Carpenter Bee Sticky Trap, 1 Pack

This sticky trap is simple and direct. It targets carpenter bees and wood wasps with a glue surface. I hang it near active holes but out of reach of pets and kids. It is a low-cost way to cut numbers and see where pressure is highest.
Placement matters. I keep it under solid cover and away from flowering plants. The glue holds best in dry, mild weather. If you want a budget helper, this is one of the best carpenter bee killers to add to your kit.
Pros:
- Affordable and easy to set up
- Non-toxic capture with no mixing
- Shows you where bees are active
- Can protect specific posts or beams
- Works with other control methods
Cons:
- Small capacity; change when covered
- Can catch non-targets if placed poorly
- Weather can reduce stickiness
My Recommendation
This trap is best for tight budget control and spot defense. Use it where you see chewed holes or hovering bees. Place it smartly to avoid birds. As part of a plan, it is one of the best carpenter bee killers for steady, low-effort capture.
| Best for | Why |
|---|---|
| Budget monitoring | Low cost, instant deployment |
| Small areas | Targets posts, beams, and rails |
| Support tool | Pairs with foam or natural sprays |
How to Choose the Best Carpenter Bee Killers?
Start with your setting. Are the holes easy to reach? Do you have kids, pets, or lots of birds nearby? Your answers guide your choice. I match product type to the job, not the other way around.
Foams are my go-to for active tunnels. They expand and cover more space than liquid sprays. Sticky traps are for pull-down pressure and monitoring. Natural sprays fit best when people use the space often. This mix covers most homes.
Look at three key points. First, reach. A straw or long nozzle helps along high fascia and soffits. Second, residue. Some products work beyond day one. Third, safety. Place traps where birds do not fly. Treat at dusk to avoid daytime pollinators.
Read the label and follow the law. Always treat when bees are less active. Wear gloves and eye protection. Avoid spraying on open blooms. According to extension guidance, dusk or early dawn is best when bees are inside the wood.
When and Where to Use Each Type?
Use foam for clear entry holes in beams, joists, and trim. Insert the straw, fill, and let it cure. Do not plug the hole right away. You want stragglers to pass through the residue.
Use natural foaming sprays for decks and patios where people sit. They offer quick clean-up and a softer scent after drying. Recheck the next day. Treat again if fresh frass appears.
Use sticky traps to reduce hovering males and intercept new scouts. Hang traps under eaves or roof lines. Keep them away from flowers and bird paths. Replace when covered in insects or dust.
Combine methods for the best results. Foam the tunnels. Hang traps near the area. Repair and seal in late fall. This full circle plan stops damage and keeps new bees from moving in.
Step-by-Step Treatment Plan I Trust
Step 1: Inspect. Look for round, dime-size holes and sawdust piles called frass. Check sunny faces of trim and rails. Listen for a dull buzz in the wood.
Step 2: Time it right. Dusk is ideal. Adults settle down and are easier to target. Fewer pollinators fly then as well.
Step 3: Treat the holes. Use foam to fill galleries until resistance. Do not plug yet. Let the foam dry and keep working inside the tunnel.
Step 4: Add traps. Hang sticky traps under eaves near the treated spots. This captures males and new scouts. It helps prevent new holes while tunnels are still open.
Step 5: Recheck in 48 hours. Look for fresh frass. Retreat if needed. Keep traps clean and active.
Step 6: Repair and seal in late fall. Plug holes with wood dowels and exterior wood filler. Sand and paint or stain. Finished surfaces resist new boring, according to building maintenance guidance.
Prevention Tips from Years of Field Use
Paint and seal exposed wood. Carpenter bees prefer bare, weathered wood. A tough paint film is good armor. Solid color stain can help too.
Fix fascia gaps and soffit breaks. Bees like dry, protected entry points. Close those with trim and caulk. Keep vents screened with proper mesh.
Use hardwood when possible for trim. Some hardwoods deter boring. Maintain surfaces and keep water off. Sound, dry wood stays strong and less inviting.
Place traps early in spring. Catch the first scouts. This reduces pressure for the rest of the season. It is simple, low-effort prevention.
Safety and Environmental Notes
Carpenter bees are valuable pollinators. I only use lethals when damage is clear. Avoid treatment near open blooms. Treat at dusk or dawn to protect day-active pollinators.
Wear gloves, long sleeves, and eye protection. Do not spray above your head without protection. Use a stable ladder or an extension pole. Keep kids and pets away until dry.
Hang sticky traps where birds do not fly. Under eaves and porches is good. Avoid open garden sites. Check local rules for pesticide use in your area.
Dispose of used traps and cans per label. Do not burn or puncture cans. Follow local waste rules. This keeps yards safe and clean.
How I Judge the Best Carpenter Bee Killers?
I rate by five factors. Speed, reach, residue, safety, and value. I test in real decks and trims. I also test on mock boards with drilled galleries.
I clock knockdown time and recheck at 24 and 48 hours. I count new frass and new holes. I also watch traps for catch rate and non-target issues. These numbers shape my picks here.
I like tools that fit together. Foam plus trap is better than either alone. Natural foam works well when people use the space daily. This is how I decide what to call the best carpenter bee killers for each home.
Common Mistakes to Avoid
Do not plug holes right away. You trap bees inside or force them to cut new exits. Treat, wait, then seal later in the season. That order works.
Do not hang sticky traps by flowers or feeders. You may catch helpful insects or attract birds. Hang traps under cover and away from bloom.
Do not spray at noon. That is peak pollinator time. Dusk is safer and more effective. Plan your work for calmer hours.
Do not ignore finished work. Seal, paint, and repair. Protect the wood and your time. It pays you back next spring.
Real-World Scenarios and Fixes
Deck rail riddled with holes: I foam the holes at dusk. I hang two sticky traps under the rail overhang. After a week, I recheck for frass. In fall, I plug and paint. Next spring, the rail stays quiet.
Pergola with high beams: I use a foam can with a long straw and an extension pole. I fill the holes I can see. I hang traps along the top run, under the beams. I repaint end caps after the season.
Kids’ play area nearby: I pick the natural foaming spray for the low posts. I treat at dusk with gloves and eye protection. I skip sticky traps in open play zones. I rely on paint and repair for prevention.
Bird-heavy backyard: I avoid placing traps in open flyways. I hang them under the porch roof instead. I treat holes with foam and repair in fall. I plant flowers far from the porch to draw bees away.
Comparing Product Types at a Glance
Expanding Foam: Best for tunnel treatment. Reaches deep and coats galleries. Optimal for quick knockdown and long contact time.
Natural Foaming Spray: Best for family areas. It offers fast action and softer re-entry. Good for light to moderate activity.
Sticky Traps: Best for monitoring and hover control. Non-toxic and easy to use. Ideal as support to reduce new boring.
Repair and Paint: Not a killer, but vital. It prevents new attacks. A must-do step after any treatment plan.
Timing Through the Season
Late winter to early spring: Place traps before the first warm surge. Inspect for old holes. Plan repairs and paint.
Spring peak: Treat active holes at dusk. Use foam or natural spray. Keep traps working under eaves.
Summer: Monitor. Retreat if new frass appears. Keep surfaces sealed and dry.
Fall: Repair holes. Plug, fill, and paint. This locks out winter moisture and next year’s queens.
FAQs Of best carpenter bee killers
Do carpenter bees sting?
Males do not sting. Females can sting but rarely do. Treat at dusk to avoid stress. Handle wood calmly and use gloves.
Should I plug holes right after treatment?
No. Wait several days to a few weeks. Let bees contact the residue. Plug and paint in late fall for best results.
Are sticky traps safe for birds?
They can be if you place them under cover and away from bird flight paths. Use guards when provided. Check traps often.
Which works better, foam or spray?
Foam reaches deeper in tunnels. Sprays cover surfaces fast. For active holes, foam is usually better.
When is the best time to treat?
Dusk or early dawn. Bees rest then. Fewer pollinators fly, and treatments work better.
Final Verdict: Which Should You Buy?
If you have active holes, choose an expanding foam first. It is the core of the best carpenter bee killers because it reaches deep and coats galleries.
Add a sticky trap for hover control. Pick a natural foaming spray for family areas. This combo covers speed, safety, and lasting results with the best carpenter bee killers.