
Measure, design, build carcasses, anchor to studs, add face frames, trim, finish.
If you want to know how to build built in cabinets, you are in the right place. I have built them in many homes, from small alcoves to full wall libraries.
This guide explains how to build built in cabinets with clear steps, pro tips, and common mistakes to avoid. Read on to plan, build, and finish a project that looks custom and lasts decades.

Planning and Design Fundamentals
Good planning saves time and money. Start with a clear use case. Is it for books, media, pantry, or office?
Measure the space. Measure height at three points. Measure width at three points. Floors and walls are rarely straight. Note outlets, switches, vents, and returns. Mark studs and plumbing.
Sketch a simple plan. Show box sizes, door style, trim, and lights. Plan for cable and power if needed. Decide on open shelves or doors. Choose paint or clear wood finish.
Mind clearances. Doors need space to swing. Pull-outs need full travel. Leave a 1/8 inch reveal on face frames. Use a 1/4 inch scribe strip at walls.
Think structure. Studs are often 16 inches on center. Anchor into studs. Plan blocking if studs do not line up. Keep top units light or anchor them well.
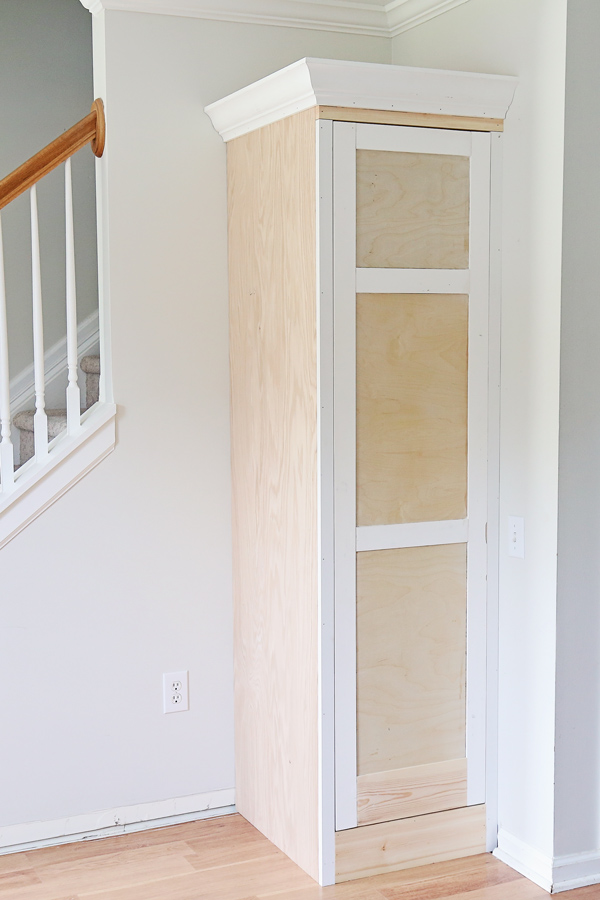
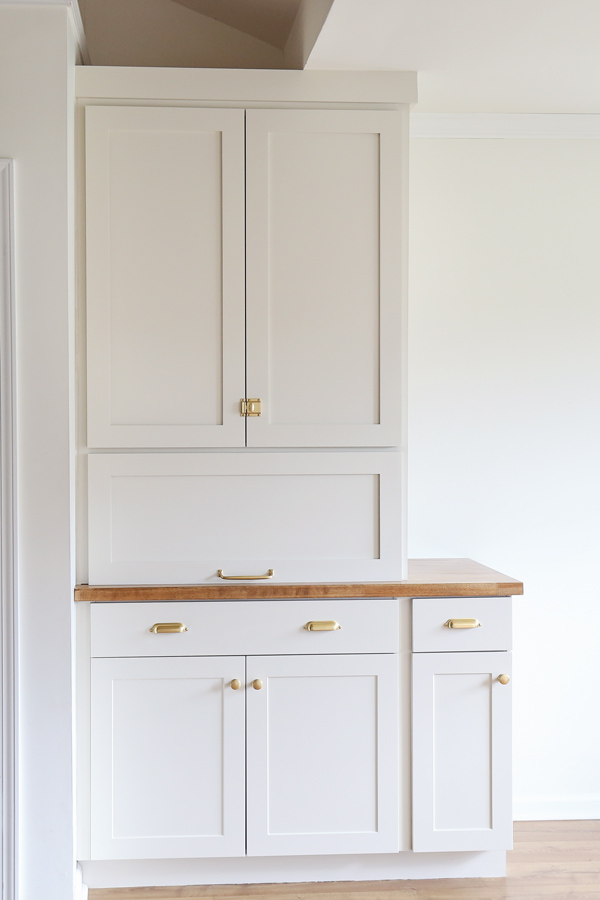
Set a style. Shaker face frames are classic. Modern looks use slab doors and clean trim. Match baseboards and crown in the room. Seamless trim sells the built-in feel.
I learned to mock up with painter’s tape. It shows scale and shelf heights. Doing this once saved me from doors that hit a thermostat.
Tools and Materials Checklist
Use the right tools for clean work and speed. You do not need a full shop, but accuracy matters.
Essential tools
- Tape, pencil, and level for layout.
- Stud finder and laser level for alignment.
- Circular saw with a guide track for straight cuts.
- Table saw or track saw for sheet ripping.
- Miter saw for trim and face frames.
- Pocket hole jig and clamp set for fast joinery.
- Drill and impact driver for assembly and install.
- Brad nailer, 18 gauge, for trim and face frames.
- Random orbit sander with 120–220 grit discs.
- Caulk gun and putty knife for finish work.
Material choices
- 3/4 inch plywood for cabinet boxes. Use birch or maple ply. Avoid particleboard in damp rooms.
- 1/4 inch plywood for backs. Use full backs for strength.
- 1×2 or 1×3 poplar for face frames. Poplar paints very well.
- Hardwood for shelves if you want a clear finish.
- Pocket screws, wood glue, construction adhesive, and shims.
- Soft-close hinges and full-extension drawer slides.
- Crown, baseboard, and scribe trim to match the room.
Pro tip: Buy one extra sheet of plywood. It covers mistakes and grain match. I rarely regret the extra sheet.
Step-by-Step: How to Build Built In Cabinets?
This is the core process for how to build built in cabinets. Follow the steps in order to keep things square and level.
- Measure and map
- Record all room dimensions. Note out-of-plumb walls.
- Mark stud locations with painter’s tape.
- Draw a cut list. Include edges and grain direction.
- Prepare the space
- Remove baseboard where cabinets will sit.
- Snap a level line for the top of base units.
- Protect floors with rosin paper or drop cloths.
- Build the cabinet boxes
- Cut sides, tops, bottoms, and shelves from 3/4 inch ply.
- Use pocket screws and glue. Keep clamps tight.
- Check square with a tape from corner to corner.
- Add a 1.5 inch set-back for face frames.
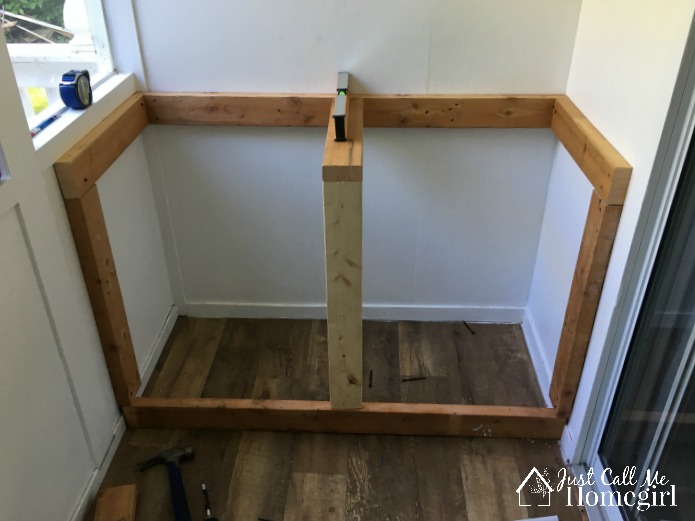
- Add backs and toe-kicks
- Install 1/4 inch backs for racking strength.
- Build a separate toe-kick platform if needed.
- Level the platform with shims before boxes go in.
- Set and anchor the boxes
- Place boxes on the platform or floor.
- Shim to level front to back and side to side.
- Screw boxes together through the stiles.
- Anchor to studs with 2.5–3 inch cabinet screws.
- Upper cabinets or bookcases
- Use a ledger board on the wall to hold weight.
- Lift, level, shim, and anchor to studs.
- Check reveals between boxes. Keep them even.
- Face frames and fillers
- Build frames from 1×2 or 1×3 poplar.
- Use 1/8 inch reveals at door openings.
- Add filler strips at walls to hide gaps.
- Nail with 18 gauge brads. Use glue at joints.
- Shelves, doors, and drawers
- Cut shelves with a back notch if needed.
- Drill shelf pin holes with a jig for clean rows.
- Build slab or Shaker doors. Or buy ready-made doors.
- Install full-extension slides for drawers.
- Trim for the built-in look
- Return baseboards into the cabinets for a clean tie-in.
- Add crown to the top if it fits the room.
- Use scribe molding to hide wall waves.
- Finish work
- Fill nail holes. Caulk tiny gaps at trim.
- Sand to 180–220 grit. Vacuum dust well.
- Prime, then paint or clear coat.
- Install hardware and adjust hinges.
Mistakes to avoid
- Do not skip shims. Leveling is key.
- Do not anchor into drywall only. Find studs.
- Do not paint without primer. Tannin bleed is real on some woods.
- Do not ignore reveals. Small gaps show big in paint.
This framework is the best way I know how to build built in cabinets without stress. It scales well from a small niche to a full wall.
Scribing, Leveling, and Anchoring Like a Pro
Walls and floors are not straight. Scribing hides this and makes the work look custom.
Scribing basics
- Clamp a wide filler strip at the wall.
- Set a compass to the widest gap.
- Trace, cut, and sand to fit. Sneak up on the line.
- Nail and glue it once the fit is tight.
Leveling long runs
- Use a long level or laser across boxes.
- Shim under low spots. Lock shims with glue.
- Re-check after anchoring. Screws can shift things.
Anchoring tips
- Pre-drill through back rails into studs.
- Use cabinet screws with washer heads.
- Tighten in stages across the run. Keep faces flush.
I learned to keep a small block plane in my pouch. It fixes tiny scribe misses fast and clean.
Electrical, HVAC, and Media Planning
Built-ins often wrap around outlets or a TV. Plan routes before you build.
Electrical
- Turn power off before any work near wires.
- Add cutouts for outlets and switches in backs.
- Use surface-mount raceways inside if needed.
- Consult a licensed pro for new circuits. Codes vary.
HVAC and airflow
- Do not block supply or return vents.
- Add a grille or a toe-kick vent cutout if needed.
- Leave space behind electronics for heat.
Media and cable
- Drill grommet holes for clean wire paths.
- Leave a chase behind upper shelves if possible.
- Plan for a pull string to add cables later.
If you are unsure, hire an electrician. It keeps the project safe and clean. It is still your build, only safer.

Finishing and Paint Systems for Built-Ins
A great finish sells the work. Prep is 80% of the result.
Surface prep
- Fill nail holes with wood filler.
- Caulk tiny gaps. Do not caulk big joints.
- Sand smooth. Vacuum and tack cloth.
Primer and paint
- Use a stain-blocking primer on knots or MDF edges.
- Sand primer with 220 grit for a smooth base.
- Use a durable enamel or cabinet-grade paint.
- Spray for best finish, or use a fine foam roller.
Clear finishes
- If you want wood grain, use hardwood face frames.
- Use a sanding sealer, then two top coats.
- Waterborne finishes dry fast and do not yellow much.
Hardware
- Mark centerlines. Use a jig for handles.
- Drill pilot holes to avoid chip-out.
- Tighten hardware after final cure.
I once rushed paint on a damp day. It flashed dull. Now I watch humidity and cure times. Patience wins.

Budget, Timeline, and DIY vs. Pro
Know costs and time before you start. It keeps stress low.
Typical DIY budget
- Plywood and trim can run a few hundred to a few thousand dollars.
- Hardware, paint, and tools add to the total.
- Doors and drawers raise cost if custom.
Time plan
- Design and ordering: 1–2 days.
- Cutting and box build: 1–3 days.
- Install and trim: 1–2 days.
- Finish and cure: 2–5 days.
DIY or hire
- DIY saves money and allows custom details.
- Hire a pro for complex electrical or heavy crown.
- Mix both. Build boxes yourself. Hire spray finishing.
Set a contingency of 10–15%. It covers surprises in walls. This approach is a smart path when planning how to build built in cabinets on a budget.

Maintenance and Longevity Tips
Care keeps built-ins looking new.
Simple care
- Wipe with a damp cloth. Avoid harsh cleaners.
- Touch up paint with a small brush as needed.
Hardware tune-up
- Adjust soft-close hinges seasonally.
- Tighten handles and knobs once a year.
Wood movement
- Leave small gaps at walls and tops.
- Use caulk for hairline cracks after a season.
Good care makes the work last. It also shows pride in craft and home.
Frequently Asked Questions of how to build built in cabinets
What wood is best for built-in cabinets?
Use 3/4 inch birch or maple plywood for boxes. Poplar is great for painted face frames because it is stable and smooth.
Do I need a table saw to build built-ins?
No, a track saw and a good guide can replace it. A table saw helps with repeat cuts but is not required.
How do I keep long cabinets level on an uneven floor?
Use shims under a separate toe-kick platform. Level the platform first, then set and anchor the boxes.
Should I paint before or after installation?
Paint face frames and doors after installation for perfect seams. You can pre-finish shelves and box interiors to save time.
How much space should I leave for door reveals?
Leave about 1/8 inch around doors and between pairs. This allows for paint and seasonal movement.
Can I add built-ins to a plaster wall?
Yes, but find studs and pre-drill to avoid cracking. Use scribe strips to handle uneven walls.
What is the easiest way to learn how to build built in cabinets?
Start with a small alcove unit and simple Shaker doors. Follow this guide on how to build built in cabinets and grow from there.
How deep should built-in cabinets be?
Base units are often 24 inches deep. For books, 10–12 inches is common to avoid overhang.
Is MDF okay for painted built-ins?
MDF is smooth and paints well for doors and panels. Use plywood for structural parts to resist sag.
How long does it take to learn how to build built in cabinets?
With basic tools, you can learn in a weekend. Mastery takes practice, but this process for how to build built in cabinets is very repeatable.
Conclusion
You now have a proven plan for how to build built in cabinets from sketch to finish. Measure well, build square boxes, anchor to studs, and trim with care. Small details like reveals, scribe strips, and primer choice make a big impact.
Choose one wall, start small, and follow the steps. You will see quick wins and real pride in the result. Want more guides on how to build built in cabinets and other custom projects? Subscribe, ask a question, or share your build story.