
Build a straight, square fence with a rigid rail and secure lock, then calibrate.
If you want clean rips, repeatable cuts, and safer work, a solid fence is key. In this guide on how to make a table saw fence, I walk you through proven designs, simple materials, and precise setup.
I have built and tuned fences for years. You will learn what works, what fails, and the small tweaks that move your fence from “okay” to dead-on. Read on to build with confidence and get pro results.
Plan your design and accuracy goals
Before you pick up a tool, define your goals. Think about what you cut most, the accuracy you need, and your budget. This is the base of a good build.
Key choices to make:
- Accuracy target. Aim for 0.002 to 0.010 inch variation across the blade.
- Fence type. A T-square style is strong and fast to set. A clamp-on fence is light and cheap.
- Material mix. Plywood and hardwood are easy to work. Aluminum angle and T-track boost precision.
- Lock style. Cam lever, screw clamp, or wedge. Each must lock tight without drift.
- Rail method. Front rail only works well if rigid. A front and rear rail gives more support.
If you want a repeatable system, a T-square is best. If you need low cost fast, a clamp-on fence works well. This plan-first approach is the smartest way to tackle how to make a table saw fence. It helps you avoid wasted cuts and warped parts.
Materials and tools
You can build a strong fence with common shop parts. Choose straight stock and check for twist with winding sticks or a level.
Recommended materials:
- Baltic birch plywood, 3/4 inch, for faces and body
- Straight-grained hardwood for the T head and rails
- Aluminum angle or square tube for the front rail
- UHMW or HDPE strips for low friction pads
- High pressure laminate or melamine for the fence faces
- T-bolts, T-track, machine screws, washers, lock nuts
- PTFE tape or paste wax for smooth slide
Useful tools:
- Table saw, miter saw, and drill press
- Router with straight bit and chamfer bit
- Clamps, square, feeler gauges, ruler, and calipers
- Files, sandpaper, and a sharp block plane
Use what you have, but do not accept warped stock. Straight material is the best start for how to make a table saw fence that stays true.
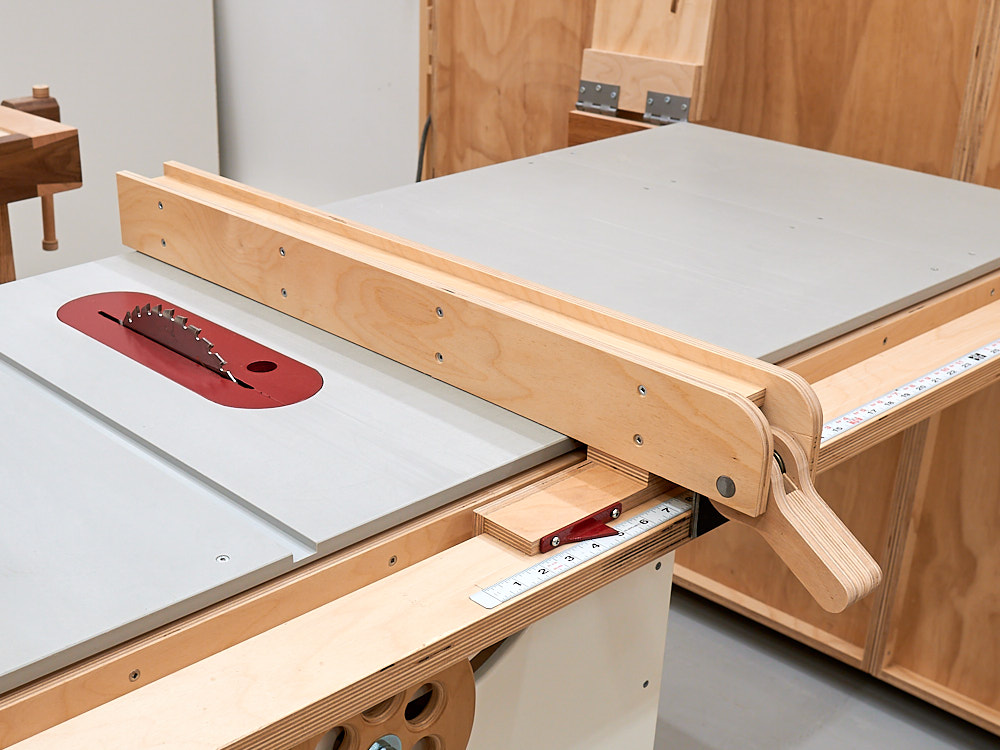
Build a T-square style fence (rigid, fast, accurate)
A T-square fence rides on a rigid front rail and locks with a lever. It is simple and very reliable. It is also my go-to design for daily use.
Step 1: Install or build the front rail
- Use 2 by 2 inch aluminum or steel tube, or 2 by 3 inch hardwood.
- Mount it parallel to the table front edge. Use bolts and fender washers.
- Shim with brass shims or cardstock until dead parallel to the miter slot.
- Confirm no sag across the blade area.
Step 2: Build the fence body
- Rip two plywood faces about 3 to 4 inches tall and longer than your blade reach.
- Add a plywood top and base to form a box. Keep it square at glue-up.
- Face the sides with laminate or melamine to reduce friction and wear.
Step 3: Make the T head
- Cut a thick hardwood block for the head. It should wrap the rail with a small gap.
- Add a pressure plate inside the head using UHMW or a hardwood pad.
- Drill for an axle bolt and add a cam lever or knob. It will press the pad to lock.
Step 4: Join head to body
- Join the head to the fence body at a true 90 degrees. Use screws into slotted holes.
- The slots let you tune square later. Leave enough play to adjust, then lock tight.
Step 5: Add features
- Install T-track on top for stops and featherboards.
- Add a micro-adjust screw at the rear. A small thumb screw against the rail works.
- Apply paste wax to the faces and rail for a smooth glide.
Step 6: Test lock and stiffness
- Slide the fence. Lock it and push from the rear. It should not move.
- Check for flex with hand pressure. If it bends, add gussets inside the body.
This T-square build is the most complete answer to how to make a table saw fence that locks fast and stays square all day.

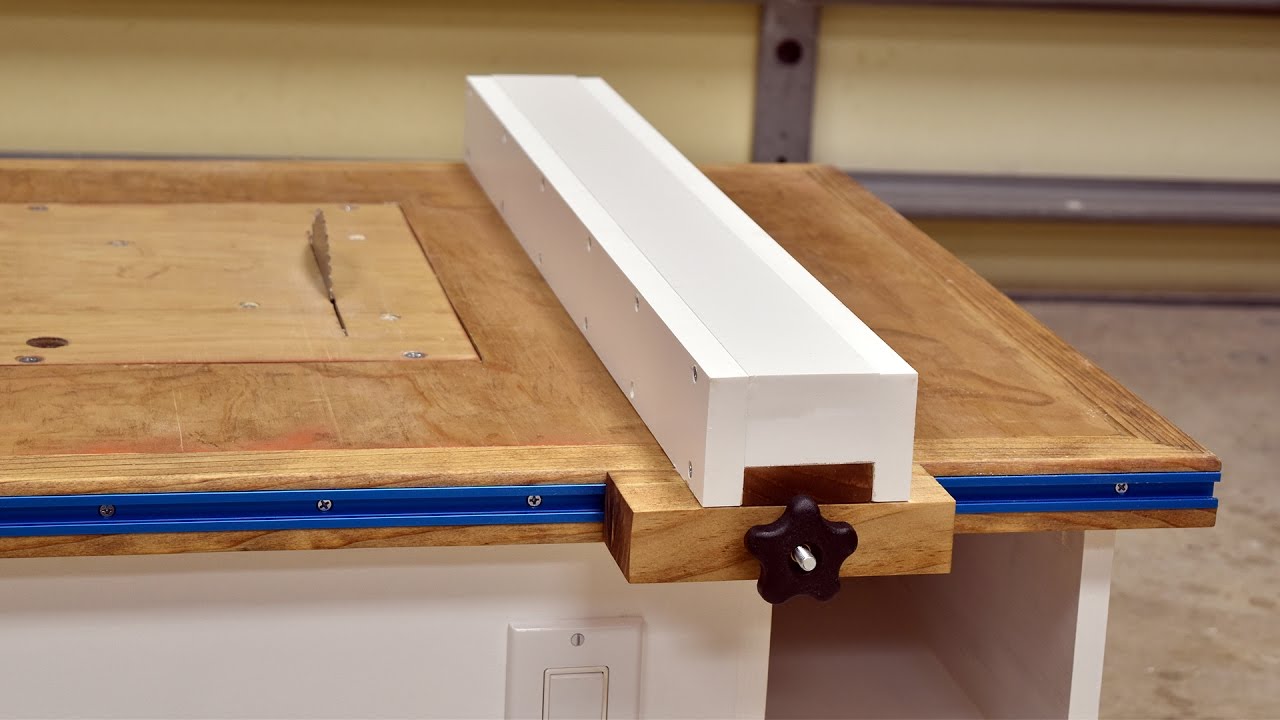
Build a simple clamp-on auxiliary fence (fast and low cost)
A clamp-on fence is great for small shops or a first build. It sits against your stock rail or table edge and locks with two clamps.
How to build:
- Make an L-shaped fence from two straight plywood pieces glued at 90 degrees.
- Face the working side with laminate. Add UHMW pads under the base.
- Use two F-style or toggle clamps to lock it to the table edge or rail.
- Add a stop block using T-track or a simple C-clamp.
This option teaches how to make a table saw fence on a tight budget. It is light, simple, and easy to store.
:max_bytes(150000):strip_icc()/102645740-69cb80d6949a4542a1bca12332ccce0e.jpg)
Square, align, and calibrate for precision
Even the best build needs careful setup. Take your time here. Small errors matter at the blade.
Steps to dial it in:
- Unplug the saw. Ensure the blade is clean and fully raised.
- Set blade parallel to the miter slot first. Adjust trunnions if needed.
- Place the fence near the blade. Measure with feeler gauges front to back.
- Aim for parallel within 0.002 to 0.005 inch across the blade.
- Set slight toe-out at the rear if you rip burn-prone woods. Keep it under 0.002 inch.
- Square the fence face to the table with a machinist square. Shim the face if needed.
- Calibrate your scale. Line the cursor to a 1 inch setup block and lock.
Do a test cut on hardwood. Flip the offcut and check with a square. Fine-tune until perfect. This is the most important step in how to make a table saw fence you can trust.

Safety, use, and upkeep
A safe fence helps you cut cleaner and keeps you calm at the saw.
Best practices:
- Always unplug before adjustments.
- Never trap stock between the fence and the blade when crosscutting. Use a miter gauge or sled.
- Use push sticks and featherboards for narrow rips.
- Keep the fence face smooth. Wax often to reduce feed force.
- Check lock tension weekly. Tighten hardware as needed.
- Store the fence off the table to avoid warping.
Good safety habits make learning how to make a table saw fence worth the effort. Your hands will thank you.

Troubleshooting common issues and simple upgrades
Small problems add up. Fix them early and add upgrades that boost speed.
Fixes:
- Fence drifts when locked. Increase cam pressure. Add a thicker pad or adjust the lever.
- Not square to table. Shim the face at the screws. Recheck with a square.
- Rough slide. Clean the rail. Add paste wax or PTFE tape under the head.
- Scale reads off. Reset the cursor with a known block. Check at several widths.
Upgrades:
- Micro-adjust carriage bolt and knurled knob at the rear for fine moves.
- Magnified cursor and steel rule along the rail.
- Replace faces with thicker MDF or phenolic for more stability.
- Add a high-low auxiliary face for tall rips and thin rips.
These tips round out how to make a table saw fence that feels like a pro system.

Cost, time, and smart alternatives
You can build a strong fence in a weekend. Most wood builds cost less than a store model and perform well if tuned with care.
Typical ranges:
- Cost: 40 to 150 dollars for wood, metal angle, and hardware
- Time: 6 to 10 hours spread over two days for build and tune
- Skill: Moderate. Accurate measuring and careful drilling are key
If time is tight, upgrade an existing fence with new faces, a micro-adjuster, and a better lock. That path also teaches how to make a table saw fence without a full rebuild.

Frequently Asked Questions of how to make a table saw fence
What is the best material for a fence face?
Laminated plywood or phenolic-faced plywood works best. They stay flat, slide well, and resist wear.
Do I need a rear rail on a T-square fence?
Not always. A rigid front rail with a solid head and lock is enough for most shops.
How do I stop burning on rips?
Ensure the fence is parallel or has a tiny toe-out. Clean your blade and use a steady feed rate.
Can I add a micro-adjust later?
Yes. Add a small screw and knob at the rear that bears on the rail. It gives precise nudges without redesign.
How often should I recalibrate the scale?
Check monthly or after moving the saw. Verify at two or three widths to catch any shift.
Is a DIY fence as accurate as a store-bought one?
It can be. If the rail is rigid and the head locks tight, you can match pro accuracy.
What blade height should I use for test cuts?
Raise the blade just above the stock thickness. This gives clean cuts and safer feedback.
Conclusion
A straight, rigid fence unlocks clean rips, safe work, and fast setups. With the right rail, a square head, and careful tuning, your shop-made fence can rival pro models. You now know how to plan, build, align, and upgrade a fence that fits your work.
Start with the design that meets your needs. Build slow, measure often, and test on scrap. Put these steps to work this week, and share your results or questions in the comments so we can improve together.