
Make clean tapered table legs with a jig, clear layout, and steady passes.
If you want to learn how to make tapered table legs that look elegant and stand solid, you are in the right place. I have built dozens of tables, from mid-century to farmhouse.
In this guide, I show how to make tapered table legs with clear steps, smart tips, and proven shop methods. You will learn tools, layout, cutting, joinery, and finish, all in a simple flow.
How to Make Tapered Table Legs: Step-by-Step Overview
A taper makes a leg look light yet stay strong. The goal is simple: remove wood from the lower part while keeping the top square for joinery.
Here is the big picture for how to make tapered table legs.
- Select straight, dry stock and mill square blanks.
- Plan the taper length, start point, and final width.
- Mark reference faces and layout lines.
- Cut the taper by table saw jig, bandsaw, or planer sled.
- Clean up with a hand plane or sander.
- Cut joinery while the top is still square.
- Sand, ease edges, and apply finish.
I use this same flow when I teach how to make tapered table legs in my shop classes. It keeps things fast and avoids errors.
What Makes a Good Tapered Leg?
A good tapered leg looks light but does not flex. You keep full thickness near the apron for strength. You remove more wood near the foot to soften the look. Aim for clean lines and repeatable parts.
For a 29 inch dining leg, a common taper starts 6 to 8 inches below the top. Many makers remove about 3 to 8 millimeters per side over the length. Another way is to remove about 12 millimeters per side over 450 millimeters. Both give a clear but calm taper.
Grain direction matters. Pick straight grain with no twist. Quartered stock moves less and planes clean. These small choices raise the quality of how to make tapered table legs.

Tools and Materials
You can make tapered legs with simple tools or with machines. Use what you have and keep it safe. Here is a list that works well.
- Wood: hard maple, white oak, walnut, cherry, or ash.
- Moisture: 6 to 8 percent is ideal for indoor tables.
- Table saw with a taper jig or a shop-made sled.
- Bandsaw with a sharp, fine tooth blade.
- Jointer and planer for milling blanks.
- Hand plane, block plane, and card scraper.
- Random orbit sander and sanding block.
- Measuring tools: square, marking gauge, ruler, and pencil.
- Clamps and stop blocks.
- PPE: safety glasses, hearing protection, dust mask.
If you ask me how to make tapered table legs with very few tools, I say a bandsaw and a hand plane can do it. It takes more time, but it works well.
Design and Measuring Your Taper
Start with a clear plan. Decide leg size at the top and at the foot. Mark the taper start line on two faces. Keep the top part full size for joinery.
Use a story stick to repeat marks across all four legs. Mark reference faces so you cut the same sides on each leg. Label the inside faces to match your apron parts. This is a quiet trick that speeds up how to make tapered table legs.
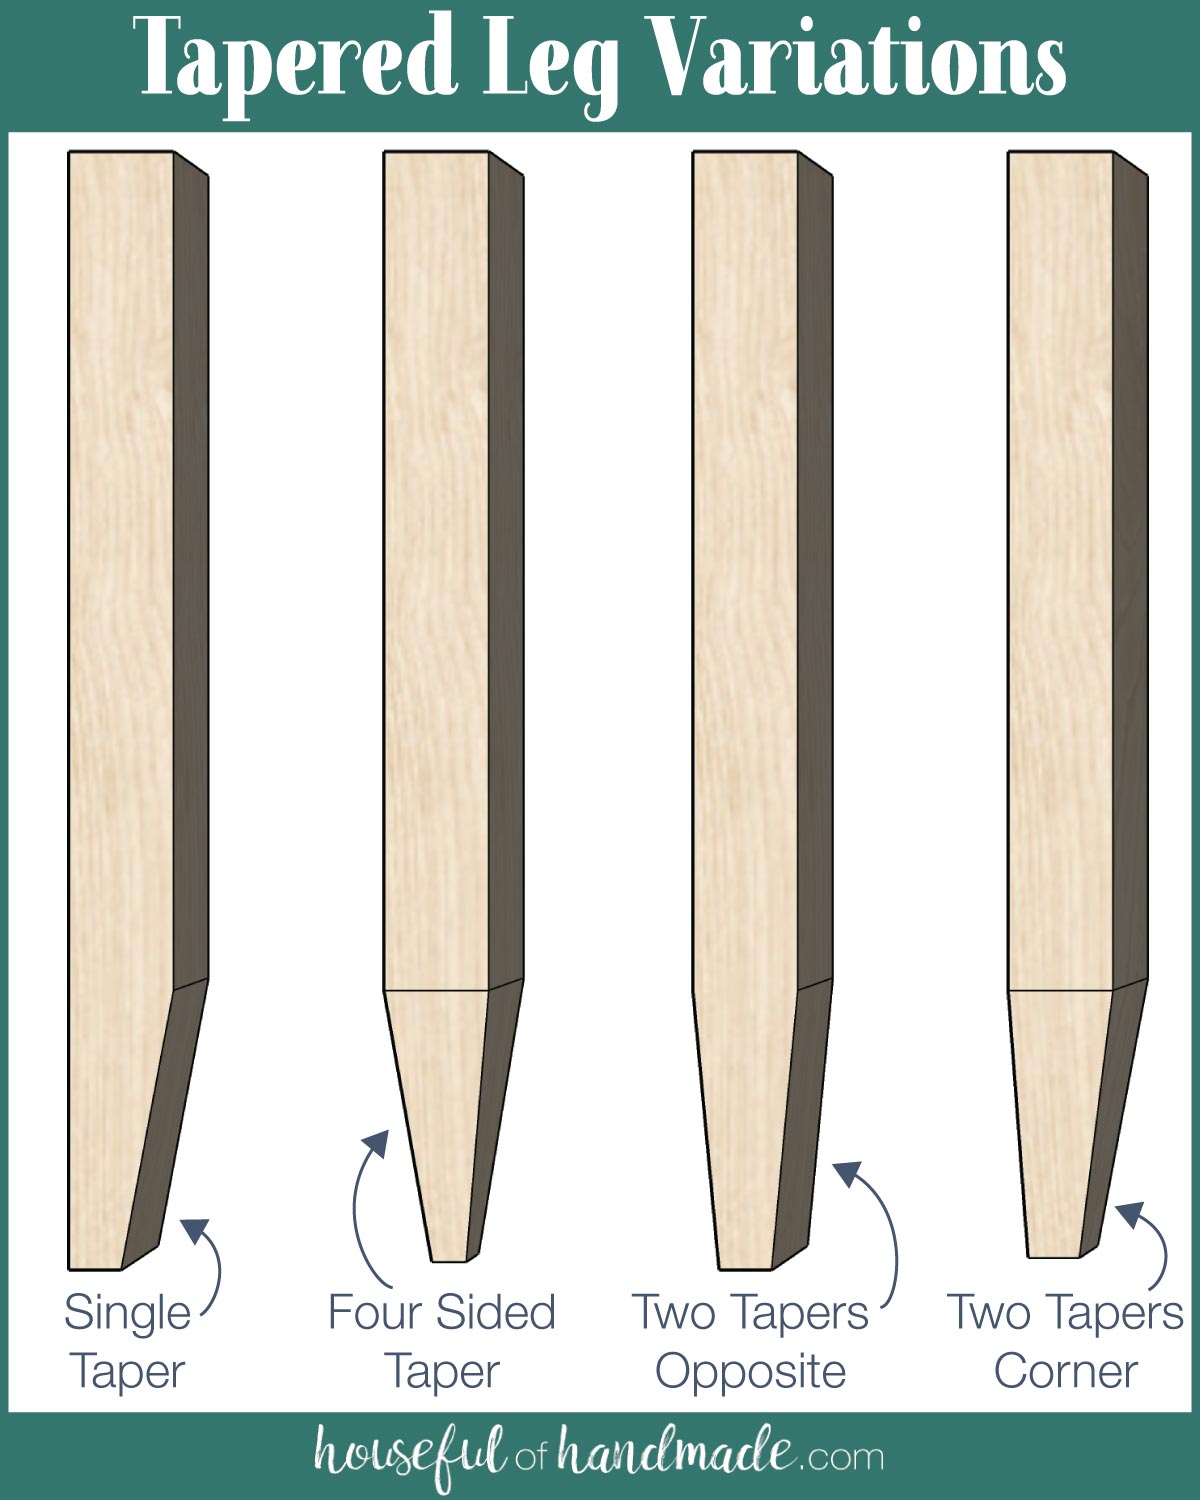
Think about style. Mid-century legs often taper on two inside faces. Shaker legs may taper on the two inside faces too, but with softer feet. Farmhouse legs might taper less, since they need a heavier look.
Method 1: Table Saw with a Taper Jig
This is the fastest way for many shops. It gives clean cuts and repeat parts.
- Mill leg blanks square and to final top size.
- Set the taper jig so the foot sits at the planned offset.
- Align the taper start mark with the blade exit point.
- Clamp the leg to the jig or use hold-downs.
- Make the first cut with slow, steady feed.
- Rotate the leg and repeat for the second face.
- Check the pair for match and adjust if needed.
Use a sharp blade. A flat top grind blade leaves nice surfaces. Do not overfeed. It can burn or wander. I often run a light second pass to kiss the line. This helps when I teach new woodworkers how to make tapered table legs with confidence.

Method 2: Bandsaw plus Hand Plane
This method is calm and safe. It is great if you do not have a table saw jig.
- Lay out the taper lines bold and clear.
- Cut just outside the line on the bandsaw.
- Use a jointer plane to hit the line and smooth the face.
- Plane with the grain. Check flat with a straightedge.
- Rotate and repeat for the second face.
A bandsaw leaves a small kerf and waste. The hand plane gives a perfect look. I like this feel. It is slow, but it builds skill. For many hobbyists asking how to make tapered table legs at home, this is the best path.
Method 3: Planer Sled for Consistent Tapers
A planer with a shim sled cuts very even tapers. It works for batch runs.
- Make a long, flat sled with a cleat at one end.
- Place a wedge under the foot end to set the taper.
- Stick the leg to the sled with double-sided tape.
- Run passes until the face is flat at the set angle.
- Remove, rotate, reset wedges, and plane the second face.
Watch for snipe. Add a sacrificial tail block to help. This is a pro tip when learning how to make tapered table legs that match within a millimeter.

Joinery That Respects the Taper
Keep the top 6 to 8 inches of the leg full size and square. This is your joinery zone. It gives strength and simple layout. Cut joinery before you shape feet or add edge breaks.
Good options include mortise and tenon, Domino, dowels, or threaded inserts for knockdown bases. Do not weaken the top with deep tapers. When I explain how to make tapered table legs to clients, I stress this point. Strong joinery beats a big taper every time.
Sanding, Edge Treatment, and Finish
Sand flat faces with a hard pad first. Use 120, then 150, then 180 grit. Ease the long edges with a small chamfer or roundover. Keep it light near the foot.
For finish, oil brings depth in walnut and cherry. Water-based poly stays clear on maple. Raise the grain with a damp wipe, then sand 220 grit. A smooth finish is the last step of how to make tapered table legs that feel great to the touch.
Troubleshooting and Common Mistakes
This section saves time and wood. Problems happen. Here is how to fix them fast.
- Burn marks: slow your feed and clean the blade. A light plane pass removes burns.
- Uneven tapers: check jig setup or shim height. Use a story stick for repeats.
- Tear-out: plane with the grain. Take finer cuts. Use a sharp iron.
- Out-of-square faces: check that your blank was square first. True it before tapering.
- Legs not matching: sort legs into pairs and tweak with a plane. Use templates.
If you are stuck on how to make tapered table legs that match, do a dry clamp-up. Stand them in place and sight from a few feet away. Your eye will find small mismatches fast.
Safety Checklist
Safe habits help you build more. Keep this short list near your bench.
- Wear eye, ear, and dust protection every time.
- Use push sticks and hold-downs. Keep hands clear.
- Lock the fence and jig before you cut.
- Stand to the side of the blade path to avoid kickback.
- Do not freehand on the table saw. Use a jig or sled.
- Keep the floor clean. No cords underfoot.
I teach these steps before I teach how to make tapered table legs. Good work needs safe work.
Frequently Asked Questions of how to make tapered table legs
What size should I start with for a table leg blank?
Most dining legs start at 45 to 60 millimeters square. Coffee or side tables can use 35 to 45 millimeters.
How much taper should I cut?
A common look removes about 12 millimeters per side over 450 millimeters. For a lighter look, push it to 16 millimeters, but keep the top strong.
Can I make tapered legs without a table saw?
Yes. Use a bandsaw to rough the cut and a hand plane to finish. This method is slower, but very safe and clean.
How do I keep all four legs the same?
Use a story stick and stop blocks. Cut one, mark it master, and match the rest to it.
What wood species works best?
Hard maple, white oak, walnut, cherry, and ash all work well. Pick straight grain and avoid knots near the joinery zone.
How do I attach tapered legs to the apron?
Mortise and tenon is the classic choice. Dowels, Domino, or threaded inserts with corner blocks also work for knockdown builds.
What finish looks good on tapered legs?
Oil-based finishes add warmth and depth. Water-based clear coats keep pale woods bright and resist yellowing.
Conclusion
You now know how to make tapered table legs with clear steps and smart checks. Pick a method that fits your tools, plan your layout, and cut with calm, steady moves. Keep joinery strong, edges smooth, and the finish even.
Start with one test leg today. Lock in your jig, take light passes, and build your set with care. Want more shop guides like this? Subscribe for fresh tips, ask a question, or share your build photos.